Project Structure
Folder and file conversions
Top-level folders
app | App Router |
pages | Pages Router |
public | Static assets to be served |
src | Optional application source folder |
Top-level files
| Next.js | |
next.config.js | Configuration file for Next.js |
package.json | Project dependencies and scripts |
instrumentation.ts | OpenTelemetry and Instrumentation file |
middleware.ts | Next.js request middleware |
.env | Environment variables |
.env.local | Local environment variables |
.env.production | Production environment variables |
.env.development | Development environment variables |
.eslintrc.json | Configuration file for ESLint |
.gitignore | Git files and folders to ignore |
next-env.d.ts | TypeScript declaration file for Next.js |
tsconfig.json | Configuration file for TypeScript |
jsconfig.json | Configuration file for JavaScript |
Routing Files
layout | .js .jsx .tsx | Layout |
page | .js .jsx .tsx | Page |
loading | .js .jsx .tsx | Loading UI |
not-found | .js .jsx .tsx | Not found UI |
error | .js .jsx .tsx | Error UI |
global-error | .js .jsx .tsx | Global error UI |
route | .js .ts | API endpoint |
template | .js .jsx .tsx | Re-rendered layout |
default | .js .jsx .tsx | Parallel route fallback page |
Nested routes
folder | Route segment |
folder/folder | Nested route segment |
Dynamic routes
[folder] | Dynamic route segment |
[...folder] | Catch-all route segment |
[[...folder]] | Optional catch-all route segment |
Route Groups and private folders
(folder) | Group routes without affecting routing |
_folder | Opt folder and all child segments out of routing |
Route Groups can be nested.
Example
Organize routes without affecting the URL path
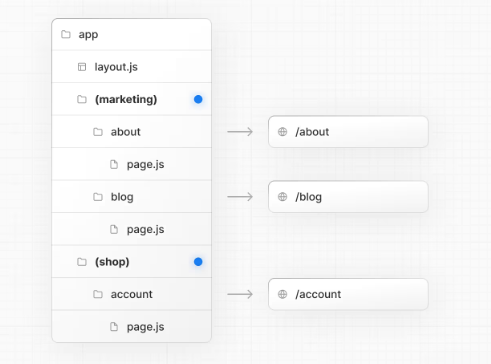
Even though routes inside
(marketing)and(shop)share the same URL hierarchy, you can create a different layout for each group by adding alayout.jsfile inside their folders.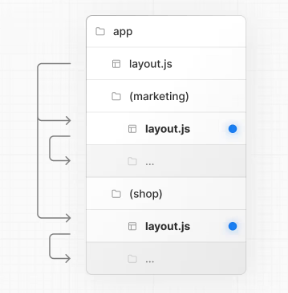
Parallel and Intercepted Routes
@folder | Named slot |
(.)folder | Intercept same level |
(..)folder | Intercept one level above |
(..)(..)folder | Intercept two levels above |
(...)folder | Intercept from root |
Metadata file conventions
App icons
favicon | .ico | Favicon file |
icon | .ico .jpg .jpeg .png .svg | App Icon file |
icon | .js .ts .tsx | Generated App Icon |
apple-icon | .jpg .jpeg, .png | Apple App Icon file |
apple-icon | .js .ts .tsx | Generated Apple App Icon |
SEO
sitemap | .xml | Sitemap file |
sitemap | .js .ts | Generated Sitemap |
robots | .txt | Robots file |
robots | .js .ts | Generated Robots file |
Organizing your project
Component hierarchy
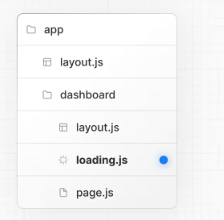
The components defined in special files are rendered in a specific hierarchy:
layout.jstemplate.jserror.js(React error boundary)loading.js(React suspense boundary)not-found.js(React error boundary)page.jsor nestedlayout.js
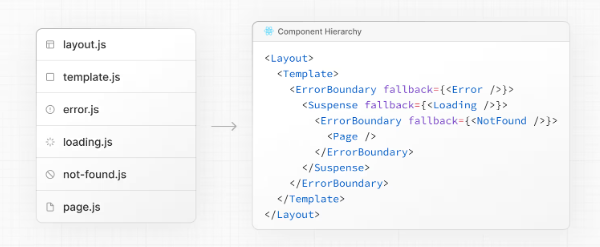
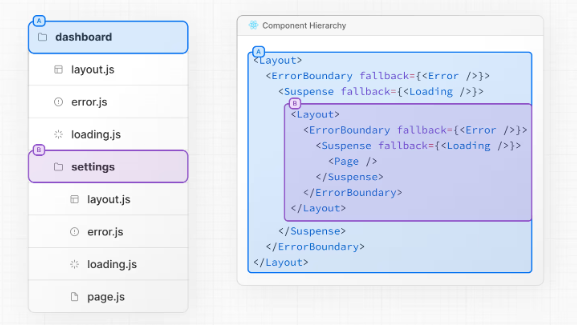
The components of a route segment will be nested inside the components of its parent segment.
Colocation
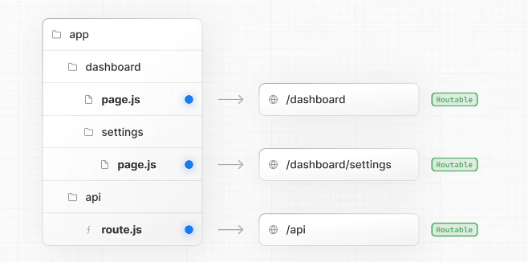
A route is not publicly accessible until a page.js or route.js file is added to a route segment.
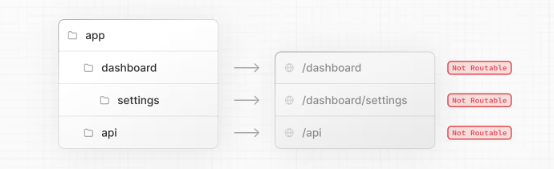
And, even when a route is made publicly accessible, only the content returned by page.js or route.js is sent to the client.
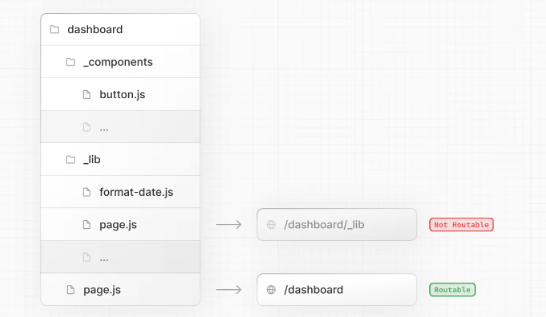
Private folders
Private folders can be created by prefixing a folder with an underscore: _folderName
his indicates the folder is a private implementation detail and should not be considered by the routing system, thereby opting the folder and all its subfolders out of routing.
Route groups
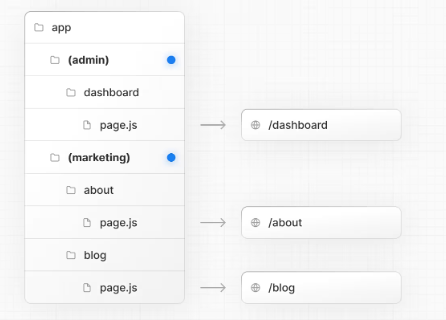
Route groups can be created by wrapping a folder in parenthesis: (folderName)
This indicates the folder is for organizational purposes and should not be included in the route's URL path.
Examples
Creating multiple root layouts
To create multiple root layouts, remove the top-level
layout.jsfile, and add alayout.jsfile inside each route group. This is useful for partitioning an application into sections that have a completely different UI or experience. The<html>and<body>tags need to be added to each root layout.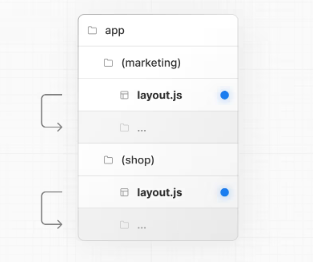
In the example above, both
(marketing)and(shop)have their own root layout.
Layouts and Pages
Creating a page
A page is UI that is rendered on a specific route.

Creating a layout
A layout is UI that is shared between multiple pages.
// app/layout.tsx
export default function DashboardLayout({
  children,
}: {
  children: React.ReactNode
}) {
  return (
    <html lang="en">
      <body>
        {/* Layout UI */}
        {/* Place children where you want to render a page or nested layout */}
        <main>{children}</main>
      </body>
    </html>
  )
}
The layout above is called a root layout because it's defined at the root of the app directory. The root layout is required and must contain html and body tags.
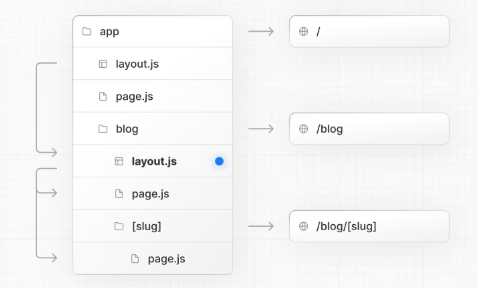
Creating a nested route
A nested route is a route composed of multiple URL segments. For example, the /blog/[slug] route is composed of three segments:
/(Root Segment)blog(Segment)[slug](Leaf Segment)
In Next.js:
- Folders are used to define the route segments that map to URL segments.
- Files (like
pageandlayout) are used to create UI that is shown for a segment.
Nesting layouts
For example, to create a layout for the /blog route, add a new layout file inside the blog folder.
Creating a dynamic segment
To create a dynamic segment, wrap the segment (folder) name in square brackets: [segmentName]. For example, in the app/blog/[slug]/page.tsx route, the [slug] is the dynamic segment.
export default async function BlogPostPage({
  params,
}: {
  params: Promise<{ slug: string }>
}) {
  const { slug } = await params
  const post = await getPost(slug)

  return (
    <div>
      <h1>{post.title}</h1>
      <p>{post.content}</p>
    </div>
  )
}
Dynamic Segments are passed as the params prop to layout, page, route, and generateMetadata functions.
the
paramsprop is a promise. In version 14 and earlier,paramswas a synchronous prop.
Linking and Navigating
Server Rendering
There are two types of server rendering, based on when it happens:
- Static Rendering (or Prerendering) happens at build time or during revalidation and the result is cached.
- Dynamic Rendering happens at request time in response to a client request.
Prefetching
Prefetching is the process of loading a route in the background before the user navigates to it. This makes navigation between routes in your application feel instant, because by the time a user clicks on a link, the data to render the next route is already available client side.
Next.js automatically prefetches routes linked with the <Link> when they enter the user's viewport.
Streaming
To use streaming, create a loading.tsx in your route folder:
What can make transitions slow?
Slow networks
To improve perceived performance, you can use the useLinkStatus hook to show inline visual feedback to the user (like spinners or text glimmers on the link) while a transition is in progress.
'use client'

import { useLinkStatus } from 'next/link'

export default function LoadingIndicator() {
  const { pending } = useLinkStatus()
  return pending ? (
    <div role="status" aria-label="Loading" className="spinner" />
  ) : null
}
useLinkStatusmust be used within a descendant component of aLinkcomponent
Server and Client Components
By default, layouts and pages are Server Components, which lets you fetch data and render parts of your UI on the server, optionally cache the result, and stream it to the client. When you need interactivity or browser APIs, you can use Client Components to layer in functionality.
When to use Server and Client Components
Use Client Components when you need:
- State and event handlers. E.g.
onClick,onChange. - Lifecycle logic. E.g.
useEffect. - Browser-only APIs. E.g.
localStorage,window,Navigator.geolocation, etc. - Custom hooks.
Use Server Components when you need:
- Fetch data from databases or APIs close to the source.
- Use API keys, tokens, and other secrets without exposing them to the client.
- Reduce the amount of JavaScript sent to the browser.
- Improve the First Contentful Paint (FCP), and stream content progressively to the client.
Examples
Using Client Components
You can create a Client Component by adding the "use client" directive at the top of the file, above your imports.
Once a file is marked with "use client", all its imports and child components are considered part of the client bundle. This means you don't need to add the directive to every component that is intended for the client.
Client components cannot be async functions.
Passing data from Server to Client Components
You can pass data from Server Components to Client Components using props.
Interleaving Server and Client Components
You can pass Server Components as a prop to a Client Component. This allows you to visually nest server-rendered UI within Client components.
Context providers
React context is commonly used to share global state like the current theme. However, React context is not supported in Server Components.
To use context, create a Client Component that accepts children:
Third-party components
When using a third-party component that relies on client-only features, you can wrap it in a Client Component to ensure it works as expected.
If you try to use <Carousel /> directly within a Server Component, you'll see an error. This is because Next.js doesn't know <Carousel /> is using client-only features.
To fix this, you can wrap third-party components that rely on client-only features in your own Client Components:
'use client'

import { Carousel } from 'acme-carousel'

export default Carousel
Now, you can use <Carousel /> directly within a Server Component
Preventing environment poisoning
JavaScript modules can be shared between both Server and Client Components modules. This means it's possible to accidentally import server-only code into the client. For example, consider the following function:
export async function getData() {
  const res = await fetch('https://external-service.com/data', {
    headers: {
      authorization: process.env.API_KEY,
    },
  })

  return res.json()
}
This function contains an API_KEY that should never be exposed to the client.
In Next.js, only environment variables prefixed with NEXT_PUBLIC_ are included in the client bundle. If variables are not prefixed, Next.js replaces them with an empty string.
As a result, even though getData() can be imported and executed on the client, it won't work as expected.
To prevent accidental usage in Client Components, you can use the server-only package.
import 'server-only'

export async function getData() {
  const res = await fetch('https://external-service.com/data', {
    headers: {
      authorization: process.env.API_KEY,
    },
  })

  return res.json()
}
Now, if you try to import the module into a Client Component, there will be a build-time error.
Build Server Components
When runningnpm run buildin Next.js, it attempts to pre-render pages. At this time, the local server is not actually running, so fetching from http://localhost:3000 will fail. There are two solutions:
- Set the page to dynamic rendering, preventing pre-rendering at build time
- Set no-cache parameters when fetching: like [
await fetch(${baseUrl}/api/users, { cache: "no-store" });]
Fetching data
Server Components
You can fetch data in Server Components using:
- The
fetchAPI - An ORM or database
Client Components
There are two ways to fetch data in Client Components, using:
- React's
usehook - A community library like SWR or React Query
Examples
Sequential data fetching
export default async function Page({ params }) {
  // These requests will be sequential
  const { username } = await params
  const artist = await getArtist(username)
  const albums = await getAlbums(username)
  return <div>{artist.name}</div>
}
Parallel data fetching
export default async function Page({
  params,
}: {
  params: Promise<{ username: string }>
}) {
  const { username } = await params
  const artistData = getArtist(username)
  const albumsData = getAlbums(username)

  // Initiate both requests in parallel
  const [artist, albums] = await Promise.all([artistData, albumsData])

  return (
    <>
      <h1>{artist.name}</h1>
      <Albums list={albums} />
    </>
  )
}
Good to know: If one request fails when using
Promise.all, the entire operation will fail. To handle this, you can use thePromise.allSettledmethod instead.
Updating data
You can update data in Next.js using React's Server Functions.
What are Server Functions?
A Server Function is an asynchronous function that runs on the server. They can be called from client through a network request, which is why they must be asynchronous.
By convention, a Server Action is an async function used with startTransition. This happens automatically when the function is:
- Passed to a
<form>using theactionprop. - Passed to a
<button>using theformActionprop.
Creating Server Functions
A Server Function can be defined by using the use server directive. You can place the directive at the top of an asynchronous function to mark the function as a Server Function, or at the top of a separate file to mark all exports of that file.
export async function createPost(formData: FormData) {
  'use server'
  const title = formData.get('title')
  const content = formData.get('content')

  // Update data
  // Revalidate cache
}

export async function deletePost(formData: FormData) {
  'use server'
  const id = formData.get('id')

  // Update data
  // Revalidate cache
}
Server Components
Server Functions can be inlined in Server Components by adding the "use server" directive to the top of the function body:
export default function Page() {
  // Server Action
  async function createPost(formData: FormData) {
    'use server'
    // ...
  }

  return <></>
}
Client Components
It's not possible to define Server Functions in Client Components. However, you can invoke them in Client Components by importing them from a file that has the "use server" directive at the top of it:
'use server'

export async function createPost() {}
Passing actions as props
'use client'

export default function ClientComponent({
  updateItemAction,
}: {
  updateItemAction: (formData: FormData) => void
}) {
  return <form action={updateItemAction}>{/* ... */}</form>
}
Invoking Server Functions
There are two main ways you can invoke a Server Function:
- Forms in Server and Client Components
- Event Handlers and useEffect in Client Components
Forms
React extends the HTML <form> element to allow Server Function to be invoked with the HTML action prop.
When invoked in a form, the function automatically receives the FormData object. You can extract the data using the native FormData methods:
// app/ui/form.tsx
import { createPost } from '@/app/actions'

export function Form() {
  return (
    <form action={createPost}>
      <input type="text" name="title" />
      <input type="text" name="content" />
      <button type="submit">Create</button>
    </form>
  )
}
// app/actions.ts
'use server'

export async function createPost(formData: FormData) {
  const title = formData.get('title')
  const content = formData.get('content')

  // Update data
  // Revalidate cache
}
Event Handlers
You can invoke a Server Function in a Client Component by using event handlers such as onClick.
Caching and Revalidating
Caching is a technique for storing the result of data fetching and other computations so that future requests for the same data can be served faster, without doing the work again. While revalidation allows you to update cache entries without having to rebuild your entire application.
Next.js provides a few APIs to handle caching and revalidation. This guide will walk you through when and how to use them.
fetch
export default async function Page() {
  const data = await fetch('https://...', { cache: 'force-cache' })
}
Good to know: Although
fetchrequests are not cached by default, Next.js will prerender routes that havefetchrequests and cache the HTML. If you want to guarantee a route is dynamic, use theconnectionAPI.
To revalidate the data returned by a fetch request, you can use the next.revalidate option.
export default async function Page() {
  const data = await fetch('https://...', { next: { revalidate: 3600 } })
}
This will revalidate the data after a specified amount of seconds.
Next.js extends the Web
fetch()API to allow each request on the server to set its own persistent caching and revalidation semantics.
unstable_cache
const getCachedUser = unstable_cache(
  async () => {
    return getUserById(userId)
  },
  [userId], // add the user ID to the cache key
  {
    tags: ['user'],
    revalidate: 3600,
  }
)
The function accepts a third optional object to define how the cache should be revalidated. It accepts:
tags: an array of tags used by Next.js to revalidate the cache.revalidate: the number of seconds after cache should be revalidated.
revalidateTag
import { revalidateTag } from 'next/cache'

export async function updateUser(id: string) {
  // Mutate data
  revalidateTag('user')
}
You can reuse the same tag in multiple functions to revalidate them all at once. In other words, you can revalidate tags used in the options of the fetch and unstable_cache methods.
revalidatePath
revalidatePath is used to revalidate a route and following an event. To use it, call it in a Route Handler or Server Action:
// app/lib/actions.ts
import { revalidatePath } from 'next/cache'

export async function updateUser(id: string) {
  // Mutate data
  revalidatePath('/profile')
}
Error Handling
Handling expected errors
Expected errors are those that can occur during the normal operation of the application, such as those from server-side form validation or failed requests. These errors should be handled explicitly and returned to the client.
Handling uncaught exceptions
Uncaught exceptions are unexpected errors that indicate bugs or issues that should not occur during the normal flow of your application. These should be handled by throwing errors, which will then be caught by error boundaries.
Global errors
While less common, you can handle errors in the root layout using the global-error.js file, located in the root app directory, even when leveraging internationalization. Global error UI must define its own <html> and <body> tags, since it is replacing the root layout or template when active.
CSS
CSS Modules
CSS Modules locally scope CSS by generating unique class names. This allows you to use the same class in different files without worrying about naming collisions.
To start using CSS Modules, create a new file with the extension .module.css and import it into any component inside the app directory(it's not necessary).
Global CSS
You can use global CSS to apply styles across your application.
Create a app/global.css file and import it in the root layout to apply the styles to every route in your application
Image Optimization
The Next.js Image component extends the HTML <img> element to provide:
Local images
You can store static files, like images and fonts, under a folder called public in the root directory. Files inside public can then be referenced by your code starting from the base URL (/).
import Image from 'next/image'

export default function Page() {
  return (
    <Image
      src="/profile.png"
      alt="Picture of the author"
      width={500}
      height={500}
    />
  )
}
If the image is statically imported, Next.js will automatically determine the intrinsic width and height.
import Image from 'next/image'
import ProfileImage from './profile.png'

export default function Page() {
  return (
    <Image
      src={ProfileImage}
      alt="Picture of the author"
      // width={500} automatically provided
      // height={500} automatically provided
      // blurDataURL="data:..." automatically provided
      // placeholder="blur" // Optional blur-up while loading
    />
  )
}
Remote images
To use a remote image, you can provide a URL string for the src property.
Since Next.js does not have access to remote files during the build process, you'll need to provide the width, height and optional blurDataURL props manually. Alternatively, you can use the fill property to make the image fill the size of the parent element.
import Image from 'next/image'

export default function Page() {
  return (
    <Image
      src="https://s3.amazonaws.com/my-bucket/profile.png"
      alt="Picture of the author"
      width={500}
      height={500}
    />
  )
}
To safely allow images from remote servers, you need to define a list of supported URL patterns in next.config.js.
import type { NextConfig } from 'next'

const config: NextConfig = {
  images: {
    remotePatterns: [
      {
        protocol: 'https',
        hostname: 's3.amazonaws.com',
        port: '',
        pathname: '/my-bucket/**',
        search: '',
      },
    ],
  },
}

export default config
When using a remote image with the
Imagecomponent by setting the image URL in thesrcproperty, the user's browser doesn't send a request directly to the URL, but instead sends it to the Next.js project server
Font Optimization
The next/font module automatically optimizes your fonts and removes external network requests for improved privacy and performance.
Google fonts
You can automatically self-host any Google Font. Fonts are included stored as static assets and served from the same domain as your deployment, meaning no requests are sent to Google by the browser when the user visits your site.
import { Geist } from 'next/font/google'

const geist = Geist({
  subsets: ['latin'],
})

export default function RootLayout({
  children,
}: {
  children: React.ReactNode
}) {
  return (
    <html lang="en" className={geist.className}>
      <body>{children}</body>
    </html>
  )
}
Local fonts
To use a local font, import your font from next/font/local and specify the src of your local font file. Fonts can be stored in the public folder or co-located inside the app folder. For example:
import localFont from 'next/font/local'

const myFont = localFont({
  src: './my-font.woff2',
})

export default function RootLayout({
  children,
}: {
  children: React.ReactNode
}) {
  return (
    <html lang="en" className={myFont.className}>
      <body>{children}</body>
    </html>
  )
}
The
localFontfunction must be declared at the top of the module (in other words, at the top of the file), and itssrcvalue cannot be a path alias (e.g.,@/fonts/my-font.woff2).
Metadata and OG images
The Metadata APIs can be used to define your application metadata for improved SEO and web shareability
Default fields
There are two default meta tags that are always added even if a route doesn't define metadata:
<meta charset="utf-8" />
<meta name="viewport" content="width=device-width, initial-scale=1" />
Static metadata
To define static metadata, export a Metadata object from a static layout.js or page.js file. For example, to add a title and description to the blog route:
import type { Metadata } from 'next'

export const metadata: Metadata = {
  title: 'My Blog',
  description: '...',
}

export default function Page() {}
Generated metadata
You can use generateMetadata function to fetch metadata that depends on data. For example, to fetch the title and description for a specific blog post:
import type { Metadata, ResolvingMetadata } from 'next'

type Props = {
  params: Promise<{ slug: string }>
  searchParams: Promise<{ [key: string]: string | string[] | undefined }>
}

export async function generateMetadata(
  { params, searchParams }: Props,
  parent: ResolvingMetadata
): Promise<Metadata> {
  const slug = (await params).slug

  // fetch post information
  const post = await fetch(`https://api.vercel.app/blog/${slug}`).then((res) =>
    res.json()
  )

  return {
    title: post.title,
    description: post.description,
  }
}

export default function Page({ params, searchParams }: Props) {}
Streaming metadata
For dynamically rendered pages, if resolving generateMetadata might block rendering, Next.js streams the resolved metadata separately and injects it into the HTML as soon as it's ready.
Statically rendered pages don’t use this behavior since metadata is resolved at build time.
Learn more about streaming metadata.
Memoizing data requests
There may be cases where you need to fetch the same data for metadata and the page itself. To avoid duplicate requests, you can use React's cache function to memoize the return value and only fetch the data once. For example, to fetch the blog post information for both the metadata and the page:
import { cache } from 'react'
import { db } from '@/app/lib/db'

// getPost will be used twice, but execute only once
export const getPost = cache(async (slug: string) => {
  const res = await db.query.posts.findFirst({ where: eq(posts.slug, slug) })
  return res
})
Static Open Graph images
Open Graph (OG) images are images that represent your site in social media. To add a static OG image to your application, create a opengraph-image.png file in the root of the app folder.
You can also add OG images for specific routes by creating a opengraph-image.png deeper down the folder structure.
Generated Open Graph images
The ImageResponse constructor allows you to generate dynamic images using JSX and CSS. This is useful for OG images that depend on data.
For example, to generate a unique OG image for each blog post, add a opengraph-image.ts file inside the blog folder, and import the ImageResponse constructor from next/og:
// app/blog/[slug]/opengraph-image.ts
import { ImageResponse } from 'next/og'
import { getPost } from '@/app/lib/data'

// Image metadata
export const size = {
  width: 1200,
  height: 630,
}

export const contentType = 'image/png'

// Image generation
export default async function Image({ params }: { params: { slug: string } }) {
  const post = await getPost(params.slug)

  return new ImageResponse(
    (
      // ImageResponse JSX element
      <div
        style={{
          fontSize: 128,
          background: 'white',
          width: '100%',
          height: '100%',
          display: 'flex',
          alignItems: 'center',
          justifyContent: 'center',
        }}
      >
        {post.title}
      </div>
    )
  )
}
ImageResponsesupports common CSS properties including flexbox and absolute positioning, custom fonts, text wrapping, centering, and nested images. See the full list of supported CSS properties.
Route Handlers and Middleware
Route Handlers
Route Handlers allow you to create custom request handlers for a given route using the Web Request and Response APIs.
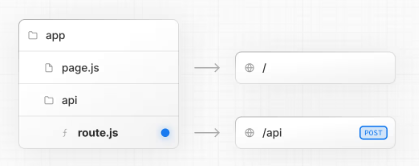
Convention
Route Handlers are defined in a route.js|ts file inside the app directory.
Route Handlers can be nested anywhere inside the app directory, similar to page.js and layout.js. But there cannot be a route.js file at the same route segment level as page.js.
Supported HTTP Methods
The following HTTP methods are supported: GET, POST, PUT, PATCH, DELETE, HEAD, and OPTIONS. If an unsupported method is called, Next.js will return a 405 Method Not Allowed response.
Extended NextRequest and NextResponse APIs
In addition to supporting the native Request and Response APIs, Next.js extends them with NextRequest and NextResponse to provide convenient helpers for advanced use cases.
Caching
Route Handlers are not cached by default. You can, however, opt into caching for GET methods. Other supported HTTP methods are not cached. To cache a GET method, use a route config option such as export const dynamic = 'force-static' in your Route Handler file.
export const dynamic = 'force-static'

export async function GET() {
  const res = await fetch('https://data.mongodb-api.com/...', {
    headers: {
      'Content-Type': 'application/json',
      'API-Key': process.env.DATA_API_KEY,
    },
  })
  const data = await res.json()

  return Response.json({ data })
}
Good to know: Other supported HTTP methods are not cached, even if they are placed alongside a
GETmethod that is cached, in the same file.
Special Route Handlers
Special Route Handlers like sitemap.ts, opengraph-image.tsx, and icon.tsx, and other metadata files remain static by default unless they use Dynamic APIs or dynamic config options.
Route Resolution
You can consider a route the lowest level routing primitive.
- They do not participate in layouts or client-side navigations like
page. - There cannot be a
route.jsfile at the same route aspage.js.
Each route.js or page.js file takes over all HTTP verbs for that route.
Middleware
Middleware allows you to run code before a request is completed. Then, based on the incoming request, you can modify the response by rewriting, redirecting, modifying the request or response headers, or responding directly.
Use cases
Some common scenarios where Middleware is effective include:
- Quick redirects after reading parts of the incoming request
- Rewriting to different pages based on A/B tests or experiments
- Modifying headers for all pages or a subset of pages
Middleware is not a good fit for:
- Slow data fetching
- Session management
Using fetch with options.cache, options.next.revalidate, or options.next.tags, has no effect in Middleware.
Convention
Use the file middleware.ts (or .js) in the root of your project to define Middleware. For example, at the same level as pages or app, or inside src if applicable.
Note: While only one
middleware.tsfile is supported per project, you can still organize your middleware logic into modules. Break out middleware functionalities into separate.tsor.jsfiles and import them into your mainmiddleware.tsfile. This allows for cleaner management of route-specific middleware, aggregated in themiddleware.tsfor centralized control. By enforcing a single middleware file, it simplifies configuration, prevents potential conflicts, and optimizes performance by avoiding multiple middleware layers.
Example
import { NextResponse } from 'next/server'
import type { NextRequest } from 'next/server'

// This function can be marked `async` if using `await` inside
export function middleware(request: NextRequest) {
  return NextResponse.redirect(new URL('/home', request.url))
}

// See "Matching Paths" below to learn more
export const config = {
  // matcher 告诉中间件只在这些路径上运行
  // `*` 表示匹配单个路径段
  // `+` 表示匹配一个或多个路径段
  // `?` 表示匹配零个或一个路径段
  // `:path*` 表示匹配所有后续路径
  matcher: '/about/:path*',
}
Read more about using middleware, or refer to the middleware API reference.