测试工具安装
安装kubectl
# 第一步
curl -LO "https://dl.k8s.io/release/$(curl -L -s https://dl.k8s.io/release/stable.txt)/bin/linux/amd64/kubectl"
# 第二步
sudo install -o root -g root -m 0755 kubectl /usr/local/bin/kubectl
# 验证版本号
kubectl version --client
安装k3d
参数
https://k3d.io/stable/#releases安装的k3d默认创建的集群的对应的版本一般不是最新的对应的k8s API的版本。可以用配置文件来指定最新的k3s镜像,来对应k8s版本。
# k3d 启动的配置文件, 定义使用最新的k3s版本[k8s版本]
apiVersion: k3d.io/v1alpha5 # 使用最新的API版本以获得所有功能
kind: Simple
metadata:
  name: my-cluster # 可以定义集群名称,也可以不指定,在k3d create cluster时指定
image: rancher/k3s:latest # 在这里指定你想要的“默认”K3s镜像版本
## 以下输入是静态的,是跟着k3d的版本走的 leite@leite-company ~> k3d version k3d version v5.8.3 k3s version v1.31.5-k3s1 (default) ## 输出以下说明已正确应用了最新的k3s版本 leite@leite-company ~ [1]> kubectl version Client Version: v1.34.1 Kustomize Version: v5.7.1 Server Version: v1.34.1+k3s1
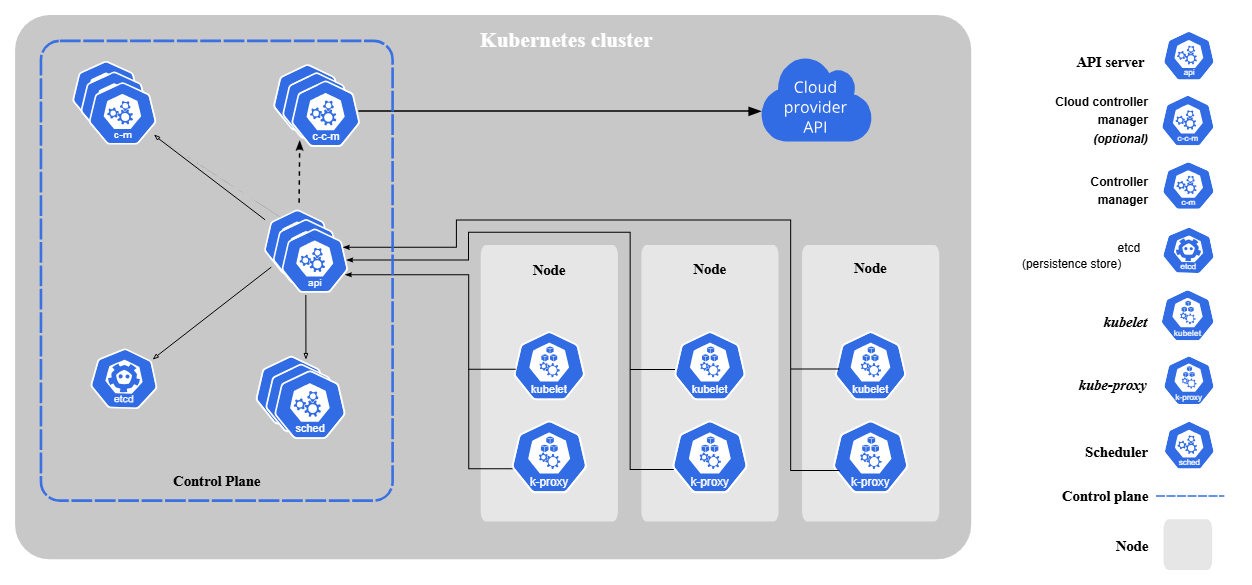
Kubernetes Components
The components of a Kubernetes cluster:
Pod
Pods are the smallest deployable units of computing that you can create and manage in Kubernetes
You don't need to run multiple containers to provide replication (for resilience or capacity)
Restarting a container in a Pod should not be confused with restarting a Pod. A Pod is not a process, but an environment for running container(s). A Pod persists until it is deleted.
Modifying the pod template or switching to a new pod template has no direct effect on the Pods that already exist.
只会根据新的更新的模板重新创建一个pod
The name of a Pod must be a valid DNS subdomain value, but this can produce unexpected results for the Pod hostname. For best compatibility, the name should follow the more restrictive rules for a DNS label
kubectl describe pod命令。它会告诉你 Pod 启动过程中发生的详细事件记录。怎么知道我的pod有没有启动成功?
- 宏观检查:
kubectl get pods还可以增加--watch还实时观察 - 详细诊断:
kubectl describe pod [pod-name] - 深入应用内部:
kubectl logs [pod-name]【可以用--previous选择来查看上一次的日志,还可以用-f】
- 宏观检查:
确认 Pod 内的应用是否真的正常工作
运行以下命令,它会在你的本地
8084端口和 Deployment 中的一个 Pod 的8084端口之间建立一个临时的、直接的通道:kubectl port-forward deployment/springboot3-deployment 8084:8084在你的本地计算机和集群内的 Pod 之间,通过 Kubernetes API Server 建立了一条临时的、加密的、点对点的通信隧道。
没有负载均衡:
port-forward不会在多个副本(replicas)之间轮询或分发流量。所有请求都会被送到同一个 Pod 实例上。会话是“粘性”的:在你按下
Ctrl+C结束port-forward命令之前,这个隧道会一直连接到最初选定的那个 Pod。没有自动故障转移:如果在
port-forward运行期间,它连接的那个 Pod 恰好“坏了”并被 Kubernetes 重启,你的port-forward连接会中断,命令会报错并退出。还可以在在集群内部测试 :
启动一个临时的测试 Pod:我们可以运行一个包含
curl等网络工具的临时 Pod。# 运行一个临时的 busybox Pod,并在结束后自动删除 kubectl run my-test-pod --image=busybox -it --rm -- sh ## kubectl run my-debug-pod --image=curlimages/curl -i --tty --rm -- /bin/sh 这个也可以在临时 Pod 内通过 Service 名称访问:Kubernetes 自带了 DNS 服务,你可以直接通过 Service 的名称来访问它。
# 假设你已经在 my-test-pod 的 shell 中
# 语法: wget -qO- http://[service-name]:[service-port]
wget -qO- http://springboot3-service:80
如果返回了应用的正确响应,说明 Service 的服务发现和端口转发都是正常的。
什么时候会单独定义和使用 Pod
场景示例:你想测试一下集群内部的网络是否通畅,或者想看某个
Service是否能被访问到。操作:你可以快速创建一个包含网络工具(如
curl,ping,dig)的 Pod,然后通过kubectl exec进入这个 Pod 进行调试。调试结束后,直接删除这个 Pod 即可,不留任何痕迹。示例 YAML (
debug-pod.yaml):apiVersion: v1 kind: Pod metadata: name: curl-pod spec: containers: - name: my-curl # 我们用一个包含 curl 的镜像,并让它一直运行,以便我们能 exec 进去 image: curlimages/curl:latest command: ["sleep", "3600"] # 让容器保持运行,否则它会立即退出使用命令:
# 创建 Pod
kubectl apply -f debug-pod.yaml

# 进入 Pod 内部执行命令
kubectl exec -it curl-pod -- sh

# (在 Pod 内部)
# curl [your-service-name].[namespace].svc.cluster.local
# exit

# 调试完毕后删除 Pod
kubectl delete pod curl-pod
Pods that are part of a DaemonSet tolerate being run on an unschedulable Node. DaemonSets typically provide node-local services that should run on the Node even if it is being drained of workload applications.
在 Kubernetes 中,这些“必须安装在每个节点上”的后台服务,就是通过 DaemonSet 来部署的。常见的例子有:日志收集器,节点监控器,网络插件,存储插件
Deployment
Deployment:负责管理和维护你的应用实例(Pod)。它会确保指定数量的 Nginx Pod 正在运行。如果某个 Pod 挂掉了,Deployment 会自动创建一个新的来替代它
在 Deployment(以及 ReplicaSet, StatefulSet, Job, CronJob 等这类控制器)的 Pod 模板(spec.template)中,metadata.name 这个字段是不能设置的。如果你尝试设置它,Kubernetes API Server 会拒绝你的请求。
Deployment 要能够正常工作(特别是运行多个副本、进行滚动更新和自我修复),其底层的 Pod 必须通过类似
generateName的机制来创建,以保证每个 Pod 名称的唯一性The server may generate a name when generateName is provided instead of name in a resource create request. When generateName is used, the provided value is used as a name prefix, which server appends a generated suffix to.
Kubernetes v1.31以后会重试8次以使生成唯一的名字
一个 Deployment 实际上并不直接管理 Pod,它的工作流程是这样的:
Deployment: 你创建了一个 Deployment 资源,它的名称是固定的(比如
nginx-deployment)。这个 Deployment 负责管理“版本”。ReplicaSet: Deployment 会根据自己的 Pod 模板,创建一个 ReplicaSet 资源。这个 ReplicaSet 的名称是动态生成的,通常是
[Deployment名称]-[Pod模板的哈希值],例如nginx-deployment-66b6c48dd5。这个哈希值确保了每次你更新 Deployment 的 Pod 模板时(比如更换镜像版本),都会创建一个全新的、不同名称的 ReplicaSet。kubectl get rs
kubectl get replicateSet
Pod: ReplicaSet 的任务很简单,就是确保有指定数量的、符合其模板的 Pod 正在运行。它会根据自己的名称作为前缀,去创建 Pod。所以,最终 Pod 的名称也是动态生成的,格式通常是
[ReplicaSet名称]-[随机后缀],例如nginx-deployment-66b6c48dd5-x7p9m。
Service
Service:负责为一组 Pod 提供一个稳定、统一的访问入口。因为 Pod 是“短暂”的,它们的 IP 地址会变化。Service 提供了一个固定的 IP 地址和 DNS 名称,使得其他应用或外部用户可以方便地访问到你的 Nginx 服务,而无需关心后端具体是哪个 Pod 在提供服务。
Service 的 IP 地址 (
ClusterIP) 和 DNS 名称的“固定”,是相对于 Service 这个 API 对象的生命周期 而言的。简单来说,只要你不删除这个 Service 对象(
kubectl delete service my-service),它的ClusterIP和 DNS 名称就不会改变。FQDN (Fully Qualified Domain Name): [service-name].[namespace-name].svc.[cluster-domain].
[cluster-domain]集群域名是集群级别的配置,通常是固定的。最可靠的查找方法是进入任意一个正在运行的 Pod,查看它的 DNS 配置文件/etc/resolv.conf# 1. 首先,随便找一个正在运行的 Pod kubectl get pods # 假设我们找到了一个叫 nginx-deployment-6bcfd6f857-klmno 的 Pod # 2. 使用 kubectl exec 进入该 Pod 并查看 resolv.conf 文件 kubectl exec -it nginx-deployment-6bcfd6f857-klmno -- cat /etc/resolv.conf ## 在上面这个命令中,cat 前面的`--` 起到分隔的作用,告诉kubectl的命令已经结束。与docker exec不同,docker exec 不需要这个输出中
search default.svc.cluster.local svc.cluster.local cluster.local最后这个cluster.local就是这个值还可以在集群内直接查询
启动一个临时的调试 Pod
# 运行一个临时的 busybox Pod,并进入其 shell 环境
kubectl run dns-test -it --rm --image=busybox:1.28 -- sh
在 Pod 内部使用
nslookup进行查询# (因为我们在 default 命名空间里) nslookup springboot3-service
你可以把 app: nginx 理解为你和 Kubernetes 的一个约定:你给一组 Pod 贴上这个独特的“名牌”,然后告诉 Deployment 和 Service 按照这个“名牌”去认领和查找它们
Service
type是ClusterIP【默认值】时ip不直接暴露到集群外部,只能被集群内的 Ingress 控制器找到。type为loadBalancer时, 端口会暴露到集群外。【在k3d中测试时,把service的type设置为loadBalance并不生效】LoadBalancer类型是NodePort的扩展。它会向底层云平台(如 AWS, GCP, Azure)请求一个外部负载均衡器,并将这个负载均衡器的 IP 地址作为 Service 的外部访问入口。- 作用:这是将服务暴露到公网的 标准方式。云服务提供商会为你创建一个负载均衡器,并将流量导向你所有节点的
NodePort。 - 使用场景:适用于生产环境,当你需要一个稳定、高可用的公网 IP 来暴露你的服务时。
- 作用:这是将服务暴露到公网的 标准方式。云服务提供商会为你创建一个负载均衡器,并将流量导向你所有节点的
Config file
kubectl 默认会在你的用户主目录下的 .kube 文件夹中寻找名为 config 的文件。
在 Linux 和 macOS 上,路径通常是 ~/.kube/config。
Most often, you provide the information to kubectl in a file known as a manifest. By convention, manifests are YAML (you could also use JSON format).
YAML 文件在两种模式下的“角色”
- 在 kubectl create -f (命令式) 中:YAML 文件是一个一次性的模板。你命令 Kubernetes:“按照这个模板,给我创建一个对象”。创建完成后,这个 YAML 文件和集群中的那个对象之间,就没有必然的联系了。Kubernetes 不会“记住”你是用哪个文件创建的它。
- 在 kubectl apply -f (声明式) 中:YAML 文件是对象的**“期望状态”的声明**。你告诉 Kubernetes:“请确保集群中有一个与这个 YAML 文件描述的状态相匹配的对象”。Kubernetes 不仅会创建这个对象,还会记录下这个“期望状态”,以便于未来的比较和更新。
仅仅修改并保存在本地 configs/ 目录下的 YAML 文件,并不会对集群产生任何影响。 Kubernetes 集群完全不知道你本地文件的变化。你必须通过 kubectl apply 这个动作,明确地告诉 Kubernetes:"请按照我最新的配置文件,去同步集群的状态。"
kubectl diff -f configs/Our previous example (replicas): The change from kubectl scale was NOT retained because the replicas field was "owned" by your YAML file. apply enforced your file's value.
The note's meaning (LoadBalancer example): Changes from other controllers (like adding a clusterIP) ARE retained, because those fields are not "owned" by your YAML file. The patch mechanism surgically updates only the fields you explicitly manage in your file.
Starting with Kubernetes v1.25, the API server offers server side field validation that detects unrecognized or duplicate fields in an object. It provides all the functionality of kubectl --validate on the server side.
服务端试运行 (Server-side Dry Run)
kubectl apply -f [your-manifest].yaml --dry-run=server如果文件有错误,它会像上面的例子一样报错。如果文件格式正确,它会返回一个成功的提示(但不会真的创建资源)。总之,--dry-run=server 是一个非常安全的验证工具。 它的设计初衷就是为了让您在真正部署到集群之前,百分之百确认您的配置清单是有效且被集群所接受的,而无需担心会意外创建或修改任何东西。
Object
Kubernetes objects are persistent entities in the Kubernetes system. Kubernetes uses these entities to represent the state of your cluster. Learn about the Kubernetes object model and how to work with these objects.
Keep in mind that label Key must be unique for a given object
Names of resources need to be unique within a namespace, but not across namespaces.
When you create an object in Kubernetes, you must provide the object spec that describes its desired state, as well as some basic information about the object (such as a name).
Almost every Kubernetes object includes two nested object fields that govern the object's configuration: the object spec and the object status.
The status describes the current state of the object, supplied and updated by the Kubernetes system and its components.
status可以理解为“看起来是什么样”,而state是“实际是什么样子的”
Each object in your cluster has a Name that is unique for that type of resource. Every Kubernetes object also has a UID that is unique across your whole cluster.
For example, you can only have one Pod named
myapp-1234within the same namespace, but you can have one Pod and one Deployment that are each namedmyapp-1234.Kubernetes 的世界观是建立在它自己的 API 对象上的。它通过 Kubelet 等组件来观测外部物理世界的状态,并尽力使其与内部的声明式状态保持一致。但如果外部世界发生了它无法观测到的剧烈变化(比如一个节点被偷偷替换了),而内部的逻辑对象没有被相应更新,就会导致这种“身份混淆”和状态不一致,从而引发各种难以排查的诡异问题。
在物理/虚拟层面销毁一个节点之前,务必先在 Kubernetes 中将其删除。
正确的操作流程应该是:
标记节点不可调度:
kubectl cordon worker-01这能防止新的 Pod 被调度到该节点上。
驱逐节点上的所有 Pod:
kubectl drain worker-01 --ignore-daemonsets这会安全地将该节点上现有的 Pod 迁移到其他节点。
--ignore-daemonsets是因为 DaemonSet 管理的 Pod 不需要被驱逐。从 Kubernetes 中删除节点对象:
kubectl delete node worker-01这一步就是“销毁学籍卡”,彻底清除它在 Kubernetes 中的所有记录。
销毁物理/虚拟机: 现在,你可以安全地去你的云平台或虚拟化平台删除这台服务器了。
A client-provided string that refers to an object in a resource URL, such as
/api/v1/pods/some-name.Only one object of a given kind can have a given name at a time. Names must be unique across all API versions of the same resource. API resources are distinguished by their API group, resource type, namespace (for namespaced resources), and name. In other words, API version is irrelevant in this context.
Kubernetes API
There are two mechanisms that Kubernetes uses to publish these API specifications
- The Discovery API
- The Kubernetes OpenAPI Document
首先,我们必须明白 Discovery API 的目的。无论是 kubectl、Rancher UI 还是任何其他与 Kubernetes 集群交互的客户端,它们在执行操作之前,都需要先知道:
- “这个集群里有哪些 API Group?”: (例如 apps, batch, networking.k8s.io 等)。
- “每个 Group 下有哪些版本?” : (例如 apps group 下有v1)“
- 每个 Group/Version 下有哪些资源 (Resource)?” : (例如 apps/v1 下有 deployments, statefulsets, daemonsets 等)
- “这些资源支持哪些操作 (Verb)?” : (例如 deployments 支持 create, get, list, delete 等)
Unaggregated Discovery (非聚合发现) Unaggregated Discovery 指的是 单个 API 服务器自身 提供的、关于 它自己所能服务的 API 的发现信息。
Aggregated Discovery (聚合发现) Aggregated Discovery 正是 Kubernetes API Aggregation Layer (聚合层) 的强大之处。它提供了一个 统一的、聚合后 的视图。 当客户端(如 kubectl)查询主 kube-apiserver 的发现端点时,聚合层不仅会返回 kube-apiserver 自己的 API 信息,还会智能地将所有已注册的扩展 API 服务器(通过 APIService 对象注册)的发现信息也一并包含进来并返回。
Kubernetes offers stable support for aggregated discovery, publishing all resources supported by a cluster through two endpoints (/api and /apis).
- /api: 列出核心 API Group (只有 v1)。【核心 API (Core API) 或称为历史遗留 API (Legacy API)】
- /apis: 列出所有非核心的 API Group (如 apps, batch, apiextensions.k8s.io 等)。【分组 API (Grouped API)】 为什么会有两个端点: 最初的设计: 在 Kubernetes 的早期,所有的 API 资源对象(如 Pod, Service, Node, ReplicationController 等)都被放在一个没有名字的 API Group 里,这个 Group 就是我们所说的“核心组 (Core Group) ”。由于它没有名字,为了访问它,API Server 就提供了 /api/v1 这个特殊的端点。在当时,这就是 Kubernetes 的全部 API。 发现扩展性问题: 随着项目的发展,开发者们很快意识到,把所有东西都塞进一个没有分组的 API 里是无法扩展的。如果我想添加一组新的 API 用于处理“批处理任务”,或者另一组 API 用于处理“网络策略”,把它们都堆在核心组里会变得非常混乱。 “命名组”的诞生: 为了解决这个问题,Kubernetes 引入了“API Group(命名组)”的概念。这允许开发者根据功能领域将 API 资源进行逻辑分组。例如: apps 组:包含 Deployment, StatefulSet, DaemonSet 等。batch 组:包含 Job, CronJob 等。 networking.k8s.io 组:包含 Ingress, NetworkPolicy 等。 所有这些“命名组”的 API 都通过一个统一的前缀 /apis 来访问,例如 /apis/apps/v1,/apis/batch/v1。
执行这个命令,你会看到 kubectl 正在向 apiserver 发出一系列的 GET 请求来发现资源
kubectl get pods --v=8查询所有可用api
kubectl api-versions直接访问 API Server去查询有哪些有用api-versions
kubectl命令实际上是在后台向 Kubernetes API Server 发送 HTTP 请求。我们也可以手动模拟这个过程来探索 API。为了安全地访问 API Server,最简单的方式是使用kubectl proxy。在一个终端中运行以下命令,让这个终端保持运行。
kubectl proxy打开另一个终端,使用
curl进行查询。curl http://127.0.0.1:8001/api ## /apis curl http://127.0.0.1:8001/apis查询所有可用的 API 资源 (
api-resources)kubectl api-resources # --api-group="" 表示查询核心组 kubectl api-resources --api-group=""Without indicating the resource type using the Accept header, the default response for the /api and /apis endpoint is an unaggregated discovery document.
the kubectl tool fetches and caches the API specification for enabling command-line completion and other features. The two supported mechanisms are as follows:
- Discovery API 就像是这本书的 “目录”。
- OpenAPI Document 就像是这本书 “正文内容中所有名词的详细解释和语法结构说明”
k3d 测试相关
在生产环境中,通常会有多个 Master 节点(在 k3d/k3s 里被称为 Server 节点)来确保高可用性。你不会直接连接到某一个 Master 节点,因为如果那个节点宕机了,你就无法访问集群了。正确的做法是连接到一个负载均衡器 (Load Balancer),由它来将你的请求转发给后面健康的 Master 节点。
k3d 在本地用 Docker 容器巧妙地复现了这套架构:
k3d-my-cluster-server-0容器: 这是真正的 K3s Server,它在容器内部运行着 Kubernetes API Server,监听着6443端口。这个容器没有直接暴露端口到宿主机,所以你从外部无法直接访问它。k3d-my-cluster-serverlb容器: 这是一个基于 NGINX 的反向代理/负载均衡器。k3d 启动它,并让它监听宿主机的一个端口,然后将流量转发给后端的 K3s Server 容器。
你的 kubectl 并不是直接和 K3s Server 容器通信。它在和一个作为负载均衡器的代理容器 (k3d-my-cluster-serverlb) 通信。这个代理容器负责将你的请求安全地转发给真正的 K3s Server 容器。39753 是 k3d 为这个负载均衡器随机选择的、暴露在你宿主机上的端口。
在k3d里测试时,设置type=LoadBalancer时没有用,即使设置k3d cluster create my-cluster -p "8080:80@loadbalancer",需要映射type=NodePort 的端口,如8080:30080
在用k3d做测试时,集群节点 "看" 不到你本地机器上的 Docker 镜像
使用
k3d image import命令k3d image import springboot3:v1.0.10 -c my-cluster修改你的 Deployment YAML 文件
imagePullPolicy: IfNotPresent # <-- 关键!添加这一行
在生产环境或更复杂的开发环境中,最佳实践是搭建一个镜像仓库(Registry),比如 Harbor、Nexus,或者直接使用 Docker Hub、阿里云 ACR 等。
Label
Labels are key/value pairs. Valid label keys have two segments: an optional prefix and name, separated by a slash (/).
Valid label value:
- must be 63 characters or less (can be empty),
- unless empty, must begin and end with an alphanumeric character (
[a-z0-9A-Z]), - could contain dashes (
-), underscores (_), dots (.), and alphanumerics between.
The API currently supports two types of selectors: equality-based and set-based.
If the prefix is omitted, the label Key is presumed to be private to the user. Automated system components (e.g. kube-scheduler, kube-controller-manager, kube-apiserver, kubectl, or other third-party automation) which add labels to end-user objects must specify a prefix.
the comma separator acts as a logical AND (&&) operator.
selector: { component: redis } 是旧版的、简洁的写法。
selector: { matchLabels: { component: redis } } 是新版的、更结构化、更推荐的写法。
Kubernetes API 在处理第一种写法时,会自动将其理解为第二种写法。
Newer resources, such as Job, Deployment, ReplicaSet, and DaemonSet, support set-based requirements as well.
selector:
  matchLabels:
    component: redis
  matchExpressions:
    - { key: tier, operator: In, values: [cache] }
    - { key: environment, operator: NotIn, values: [dev] }
set-based requirements 应用用引号包起来
kubectl get pods -l 'environment in (production),tier in (frontend)'
kubectl get pods -l environment=production,tier=frontend
kubectl get pods -Lapp -Ltier -Lrole
‘-L’ 参数不是过滤作用,而是在最终的查询结果中以列的形式显示
更新label
kubectl label pods -l app=nginx tier=feThis first filters all pods with the label "app=nginx", and then labels them with the "tier=fe"。除了用-l app=nginx标签来过滤,还可以用pod的名字来过滤需要操作的pods
默认情况下,当已经存在tier标签时,不会更新成功。可以加入
kubectl label --overwrite pods这个参数
Namespace
Namespace-based scoping is applicable only for namespaced objects (e.g. Deployments, Services, etc.) and not for cluster-wide objects (e.g. StorageClass, Nodes, PersistentVolumes, etc.)
For a production cluster, consider not using the default namespace. Instead, make other namespaces and use those.
Kubernetes starts with four initial namespaces:
- default
- kube-node-lease
- kube-public
- kube-system
Avoid creating namespaces with the prefix kube-, since it is reserved for Kubernetes system namespaces.
kubectl get namespace
To set the namespace for a current request, use the --namespace flag.
kubectl run nginx --image=nginx --namespace=[insert-namespace-name-here]
kubectl get pods --namespace=[insert-namespace-name-here]
You can permanently save the namespace for all subsequent kubectl commands in that context.
kubectl config set-context --current --namespace=[insert-namespace-name-here]
# Validate it
kubectl config view --minify | grep namespace:
Not all objects are in a namespace
However namespace resources are not themselves in a namespace. And low-level resources, such as nodes and persistentVolumes, are not in any namespace.
# In a namespace
kubectl api-resources --namespaced=true

# Not in a namespace
kubectl api-resources --namespaced=false
The Kubernetes control plane sets an immutable label kubernetes.io/metadata.name on all namespaces. The value of the label is the namespace name
kubectl describe namespaces kube-system
The keys and the values in the map must be strings. In other words, you cannot use numeric, boolean, list or other types for either the keys or the values.
Annotations
Annotations are key/value pairs. Valid annotation keys have two segments: an optional prefix and name, separated by a slash (/).
The name segment is required and must be 63 characters or less, beginning and ending with an alphanumeric character (
[a-z0-9A-Z]) with dashes (-), underscores (_), dots (.), and alphanumerics between.Shared labels and annotations share a common prefix: app.kubernetes.io. Labels without a prefix are private to users. The shared prefix ensures that shared labels do not interfere with custom user labels.
Shared Labels 是一套 官方推荐的、标准化的标签。它们使用
app.kubernetes.io/这个统一的前缀,目的是为了让不同的工具、团队和用户能够用一种通用的方式来描述和识别在 Kubernetes 中运行的应用程序The metadata is organized around the concept of an application. Kubernetes is not a platform as a service (PaaS) and doesn't have or enforce a formal notion of an application. Instead, applications are informal and described with metadata. The definition of what an application contains is loose.
Field selectors
Field selectors are essentially resource filters. By default, no selectors/filters are applied, meaning that all resources of the specified type are selected. This makes the kubectl queries kubectl get pods and kubectl get pods --field-selector "" equivalent.
You can use the =, ==, and != operators with field selectors (= and == mean the same thing).
kubectl get services --all-namespaces --field-selector metadata.namespace!=default
As with label and other selectors, field selectors can be chained together as a comma-separated list.
kubectl get pods --field-selector=status.phase!=Running,spec.restartPolicy=Always
Finalizer
Finalizer 是一个存在于资源对象 metadata 中的字符串列表。
这个 Finalizer 确保了当你删除这个 Service 时,Kubernetes 会先调用云平台的 API 去删除那个真实的、会产生费用的负载均衡器,然后再删除 Service 对象本身。如果没有这个机制,你可能会留下很多无人管理的“僵尸”云资源。
Finalizer:
service.kubernetes.io/load-balancer-cleanup(在一些云厂商的实现中)为什么资源会卡在 Terminating 状态?🚨 这是你在实践中一定会遇到的经典问题。当一个资源长时间处于 Terminating 状态时,几乎 100% 是 Finalizer 导致的。
原因:负责清理并移除那个 Finalizer 的控制器无法完成它的工作。
Finalizers are namespaced keys that tell Kubernetes to wait until specific conditions are met before it fully deletes resources marked for deletion. Finalizers alert controllers to clean up resources the deleted object owned.
Marked for deletion (标记为删除): 资源有了
deletionTimestamp,处于Terminating状态。它对外已经“死亡”(比如 Pod 不再接收流量),但它的“尸体”(在 etcd 中的记录)还在。Fully deleted (彻底删除): 资源的记录从 etcd 中被彻底抹除,它不复存在了。
Specific conditions are met (特定条件被满足): 这个“特定条件”非常明确,指的就是
metadata.finalizers列表变为空。那么谁来清空这个列表呢?答案是控制器 (Controller)。
- 每个 Finalizer 字符串都对应一个正在运行的控制器。
- 这个控制器一直在监控,当它发现自己负责的资源出现了
deletionTimestamp时,它就知道该干活了(执行清理任务)。 - 清理任务完成后(比如云硬盘被删了,数据库备份好了),控制器就会发起一个 API 请求,把自己负责的那个 Finalizer 字符串从列表中移除。
- 当所有控制器都完成了自己的任务,
finalizers列表就变空了。
它实际上是一个字符串。这些字符串存在于一个列表里,位置在
metadata.finalizers它们像带有名空间的键一样,是独一无二的标识符
简单来说:你可以把它理解为“带有唯一前缀的特殊标签”。
metadata:
  finalizers:
  - kubernetes.io/pv-protection  # 一个遵循 "namespaced key" 格式的字符串
  - another.tool.com/do-backup    # 另一个遵循同样格式的字符串
Custom finalizer names must be publicly qualified finalizer names, such as example.com/finalizer-name. Kubernetes enforces this format; the API server rejects writes to objects where the change does not use qualified finalizer names for any custom finalizer.
Dependent objects also have an ownerReferences.blockOwnerDeletion field that takes a boolean value and controls whether specific dependents can block garbage collection from deleting their owner object. Kubernetes automatically sets this field to true if a controller (for example, the Deployment controller) sets the value of the metadata.ownerReferences field. You can also set the value of the blockOwnerDeletion field manually to control which dependents block garbage collection.
关系链: Deployment -> ReplicaSet -> Pod。
删除链: 删除 Deployment -> 删除 ReplicaSet -> 删除 Pod。
blockOwnerDeletion: true: 是一个 “刹车”。Dependent 对象对 Owner 说:“别删我老板,除非我先走!”
kubectl delete deployment 触发的是一个“有序解散”,而非“斩首行动【直接删除deployment】”
In foreground deletion, it adds the foreground finalizer so that the controller must delete dependent resources that also have ownerReferences.blockOwnerDeletion=true before it deletes the owner.
kubectl delete deployment my-app --cascade=orphan
会发生什么?
Deployment对象被立即删除:my-app这个Deployment资源瞬间就消失了。ReplicaSet和Pod完好无损:你会惊讶地发现,ReplicaSet和所有的Pod依然在运行!ReplicaSet成为孤儿:如果你查看那个幸存的ReplicaSet的 YAML (kubectl get rs [rs-name] -o yaml),你会发现它metadata里的ownerReferences字段已经不见了。它不再属于任何人,变成了一个独立的、没人管理的ReplicaSet。
K3d 运行( PLG 栈: Promtail + Loki + Grafana)
准备工作: 安装helm
sudo snap install helm --classic第一步:理解架构
在动手之前,先看一眼我们将要搭建的架构:
- Promtail (搬运工):它以 DaemonSet 的形式运行,意味着你 k3d 的每一个“节点容器”里都会自动运行一个 Promtail。它负责去
/var/log/pods(就是你刚才进去的那个目录)抓取日志,并打上标签(Pod名、Namespace等)。 - Loki (仓库):它是核心存储,负责接收 Promtail 发来的流,并进行压缩存储。
- Grafana (仪表盘):可视化的 Web 界面,我们在这里查询和看图。
- Promtail (搬运工):它以 DaemonSet 的形式运行,意味着你 k3d 的每一个“节点容器”里都会自动运行一个 Promtail。它负责去
第二步:使用 Helm 安装 Loki-Stack 为了简化流程,我们使用官方的 loki-stack Chart,它会把上面三个组件打包一起装好。
1. 添加 Grafana 仓库 在你的终端执行:
helm repo add grafana https://grafana.github.io/helm-charts
helm repo update
2. 创建一个独立的 Namespace 把监控相关的资源隔离出来是个好习惯:
kubectl create namespace logging3. 安装 PLG 栈 执行下面的命令。 注意:我们显式开启了 Grafana,因为这个 Chart 默认可能不安装它。
helm upgrade --install loki grafana/loki-stack \
  --namespace logging \
  --set grafana.enabled=true \
  --set promtail.enabled=true \
  --set loki.persistence.enabled=false
(注:为了 k3d 实验方便,我关闭了 persistence 持久化存储。如果你重启 k3d 集群,Loki 里的旧日志会丢失,但对实验来说足够了且更轻量。)
第三步:验证安装
等待几分钟,查看 Pod 是否都跑起来了:
kubectl get pods -n logging你应该能看到类似这样的列表:
loki-0(或者loki-promtail-...)loki-grafana-...
如果状态都是
Running,恭喜你,系统已经由守转攻了!第四步:获取 Grafana 密码
Grafana 默认生成的
admin密码保存在 K8s 的 Secret 里。我们需要把它解密出来。执行这条命令(这是运维人员必备的“黑客”技能):
# 获取 secret,提取 admin-password 字段,并 base64 解码 kubectl get secret --namespace logging loki-grafana -o jsonpath="{.data.admin-password}" | base64 --decode ; echo终端会输出一串字符,复制它,这就是你的登录密码。
第五步:访问 Grafana (Port Forwarding)
因为你在 k3d 里面,外部无法直接访问 ClusterIP。我们需要用
port-forward把 Grafana 的端口映射到你物理机的localhost# 将 k8s 内部的 80 端口映射到你电脑的 3000 端口 kubectl port-forward --namespace logging service/loki-grafana 3000:80注意:这个命令会占用终端,不要关闭它。
第六步:见证奇迹的时刻
- 打开浏览器,访问:
http://localhost:3000 - 用户名:
admin - 密码:刚才复制的那串字符。
- 进入首页后,点击左侧菜单的 "Explore" (指南针图标)。
- 在顶部的下拉框中,确保选择了 "Loki" 作为数据源。
现在,我们来查你的 Spring Boot 日志!
- 打开浏览器,访问:
高级查询
## ~ 为正则
{namespace="default"} | json | level="ERROR"
{namespace="default"} | json | message != "exception"
{namespace="default"} | json | message !~ "(?i).*exception.*"
{namespace="default"} | json | message = "exception"
{namespace="default"} | json | message =~ "(?i).*exception.*"
{namespace="default"} |=
{namespace="default"} |~
{namespace="default"} !=
{namespace="default"} !~
其它
kind: Ingress会暴露一个 IP 地址吗?不会,
Ingress资源本身不会。一个kind: Ingress的 YAML 文件,它仅仅是一套规则的集合,就像一张写着“a.com的流量请走A门,b.com的流量请走B门”的说明书。这张说明书本身并没有地址,它需要被人(也就是Ingress Controller)去阅读和执行。真正暴露 IP 地址的,是
Ingress Controller的Service!回顾一下
Ingress Controller是如何被安装的:- Ingress Controller 是一个需要被
安装到集群中的应用,它不是 K8s 自带的。 - 安装的本质是应用一套包含了
Deployment、Service、RBAC等资源的 YAML 文件。 - K3s 用户最幸福,因为 K3s 已经内置了 Traefik,无需手动安装。你只需要直接在
Ingress中使用ingressClassName: "traefik"即可。 - 在标准 K8s 环境中,最常用的选择是 NGINX Ingress Controller,可以通过官方
kubectl apply命令或HelmChart 来安装。 IngressClass资源是在安装 Controller 的过程中被自动创建的。它像一个“告示牌”,告诉整个集群:“嘿,我这里有一个名为nginx(或traefik) 的 Controller,你们谁需要处理 Ingress 规则,就通过ingressClassName来找我!”
现在,
Ingress(规则)、Ingress Controller(执行者) 和IngressClass(联系方式) 这三者之它通常包含一个
Deployment(运行 Controller 的 Pods) 和一个Service(把这些 Pods 暴露出去)。这个Service的类型通常是LoadBalancer或NodePort。- 当
Service的类型是LoadBalancer时,云服务商会为这个 Service分配一个公网 IP 地址。 - 当
Service的类型是NodePort时,你可以通过任何一个节点的 IP +NodePort端口来访问。
那个宝贵的、唯一的、对外服务的公网 IP 地址,是属于 Ingress Controller 的 Service 的,而不是属于你创建的某一个
Ingress规则对象的。你可以通过以下命令查看到这个 IP 地址:
# 查看 Ingress Controller 的 Service # 注意命名空间,如果你是用 helm 装的 nginx-ingress,那就在 ingress-nginx 命名空间 # 如果是 k3s 自带的 traefik,那就在 kube-system kubectl get service -n ingress-nginx # 你会看到类似这样的输出 # NAME TYPE CLUSTER-IP EXTERNAL-IP PORT(S) AGE # ingress-nginx-controller LoadBalancer 10.43.151.108 203.0.113.55 80:32168/TCP,443:30256/TCP 10m # ^^^^^^^^^^^^ # 就是这个 IP!- Ingress Controller 是一个需要被
故障排查三步法
第 1 步:确认 Pods 是否健康运行
kubectl get pods -o wide第 2 步:确认 Service 是否正确关联了 Pods
kubectl describe service nginx-service正确的状态:
Endpoints后面应该列出了一个或多个 IP 地址和端口,这些 IP 应该与你在上一步中看到的 Pod IP 完全一致。Endpoints: 10.42.0.5:80,10.42.0.6:80第 3 步:确认 k3d 节点的端口映射 (最可能的原因)
最快、最直接的绕过网络问题的方法,我们在上次讨论中也提到了。它不依赖任何端口映射,而是直接在你的电脑和 Service 之间建立一条隧道。
# 在新终端中运行
kubectl port-forward service/nginx-service 8080:80
MetalLB (强烈推荐) 这是在自建集群(Bare-Metal)中实现 type: LoadBalancer 的最佳实践方案。MetalLB 是一个开源项目,它能为你的集群模拟云服务商的负载均衡器功能。
使用 kubectl explain 命令:这是一个非常有用的命令,可以帮助你了解任何 Kubernetes 资源的结构和字段。例如,如果你想知道 Deployment 的 apiVersion
如
kubectl explain Deployment
# GROUP:      apps
# KIND:       Deployment
# VERSION:    v1
所以定义Deployment时为:
apiVersion: apps/v1
kind: Deployment
一个完整的应用[系统],一般只有一个type为loadbalancer的service?
对于一个完整的、现代化的应用系统(特别是基于微服务架构的 Web 应用),通常最佳实践就是只使用一个 Type=LoadBalancer 的 Service。标准的应用暴露架构:“LoadBalancer + Ingress Controller”
如果你的应用系统包含一些非 HTTP/HTTPS 的服务,比如:
- 一个需要直接暴露给外部客户端的 数据库 (如 PostgreSQL)。
- 一个 MQTT 消息代理服务。
- 一个 SFTP 文件服务。
这些服务工作在 TCP/UDP 层,Ingress Controller(通常为 HTTP 设计)无法处理。在这种情况下,为这些特定的服务再额外创建一个独立的 Type=LoadBalancer Service 是完全合理的。
In case of a Node, it is implicitly assumed that an instance using the same name will have the same state (e.g.network settings, root disk contents) and attributes like node labels.
这里的instance是指虚拟机或者物理机。 Kubernetes 认‘名’不认‘人’。它把节点名称当作身份证号。如果一个新人拿了旧人的身份证号来报到,系统会把他当成旧人,但这个新人的能力和背景(磁盘内容、硬件属性)是全新的。这种身份与实际能力的不匹配,正是很多诡异问题的根源。请务必确保在替换节点时,先‘注销’旧的身份信息(kubectl delete node),再让新人用自己的身份注册。
Register the node with the given list of taints
可以把 Taint (污点) 想象成节点(Node)上的一个“排斥标签”或者“谢绝入内”的牌子。 一旦一个节点被打上了某个 Taint,Kubernetes 的调度器(Scheduler)默认就不会把任何 Pod 调度到这个节点上。这就好像一个房间门口挂着“请勿打扰”的牌子,正常情况下,没有人会进去。
Container
Container hooks
PostStart
However, if the
PostStarthook takes too long to execute or if it hangs, it can prevent the container from transitioning to arunningstate.PreStop
PreStophooks are not executed asynchronously from the signal to stop the Container; the hook must complete its execution before the TERM signal can be sent.
Hook 失败的影响:
postStartHook 失败:如果postStartHook 执行失败,容器将无法进入Running状态,kubelet会杀死并尝试重启这个容器,导致 Pod 进入CrashLoopBackOff状态。preStopHook 失败:preStopHook 的失败不会阻止容器的终止。Kubernetes 在尝试执行preStopHook 后(无论成功与否),仍然会向容器的主进程发送TERM信号。其实也可以总结为这两个hook只要有一个失败,容器都会被killed
Hook handler implementations
- Exec
- 执行环境:
Exec类型的 Hook Handler 完全在容器内部执行。它和你在容器启动后使用kubectl exec或docker exec进入容器执行命令的环境是一模一样的。 - 资源归属:因此,这个脚本或命令所消耗的 所有资源(CPU、内存等)都计算在该容器的账上。它会受到为该容器配置的
resources.limits和resources.requests的约束。
- HTTP
- Sleep
httpGet,tcpSocket(deprecated) andsleepare executed by the kubelet process (请求的接收和处理发生在容器内,因此处理该请求所消耗的资源归属于容器), andexecis executed in the container.
配置preStop sample:
spec:
  containers:
  - name: nginx
    image: nginx:1.25
    ports:
    - containerPort: 80
    lifecycle:
      preStop:
        ## 或者 httpGet:
        exec:
        ....
Hook delivery guarantees
这些hook可能会运行多次。这个概念在分布式系统中非常常见,被称为 “至少一次 (At-Least-Once)” 投递语义
Debugging Hook handlers
这些Hook handlers如果执行失败,可以执行像类似的语句来查看日志kubectl describe pod lifecycle-demo
Workloads
A workload is an application running on Kubernetes. Whether your workload is a single component or several that work together, on Kubernetes you run it inside a set of pods. In Kubernetes, a Pod represents a set of running containers on your cluster.
several built-in workload resources:
- Deployment and ReplicaSet (replacing the legacy resource ReplicationController).
- StatefulSet
- DaemonSet defines Pods that provide facilities that are local to nodes.
- Job and CronJob provide different ways to define tasks that run to completion and then stop. You can use a Job to define a task that runs to completion, just once. You can use a CronJob to run the same Job multiple times according a schedule.
In the wider Kubernetes ecosystem, you can find third-party workload resources that provide additional behaviors. Using a custom resource definition, you can add in a third-party workload resource if you want a specific behavior that's not part of Kubernetes' core.
Pods
Pods are the smallest deployable units of computing that you can create and manage in Kubernetes. 你可以把一个 Pod 想象成一台独立的“逻辑主机”或虚拟机。这台“主机”有自己唯一的 IP 地址。
Pods in a Kubernetes cluster are used in two main ways:
Pods that run a single container.
Pods that run multiple containers that need to work together.
You should use this pattern only in specific instances in which your containers are tightly coupled. You don't need to run multiple containers to provide replication (for resilience or capacity);
Using Pods
apiVersion: v1
kind: Pod
metadata:
  name: nginx
spec:
  containers:
  - name: nginx
    image: nginx:1.14.2
    ports:
    - containerPort: 80
Pods are generally not created directly and are created using workload resources. Instead, create them using workload resources such as Deployment or Job. If your Pods need to track state, consider the StatefulSet resource.
Working with Pods
Pods are designed as relatively ephemeral, disposable entities. The Pod remains on that node until the Pod finishes execution, the Pod object is deleted, the Pod is evicted for lack of resources, or the node fails.
Note:
Restarting a container in a Pod should not be confused with restarting a Pod. A Pod is not a process, but an environment for running container(s). A Pod persists until it is deleted.
The name of a Pod must be a valid DNS subdomain value, but this can produce unexpected results for the Pod hostname. For best compatibility, the name should follow the more restrictive rules for a DNS label.
Pod OS
对
.spec.os.name字段的理解在 Pod 的 YAML 中设置
.spec.os.name字段并不会影响kube-scheduler(调度器) 的实际调度决策。它的主要作用有两点:- 声明与识别 (Declaration & Identification): 它是一个明确的元数据字段,用来声明这个 Pod 内的容器是为哪个操作系统构建的(目前是
linux或windows)。这使得集群中的其他组件或工具(比如监控系统、安全策略工具)能够轻松识别 Pod 的操作系统类型。 - 策略应用 (Policy Enforcement): 如文档中提到的,
Pod Security Standards(Pod 安全标准) 会利用这个字段。例如,某些安全策略只适用于 Linux 环境(比如与seccomp或AppArmor相关的策略),在 Windows 节点上强制执行这些策略是没有意义的。通过读取.spec.os.name, 系统可以智能地避免在不相关的操作系统上应用这些策略。 - 面向未来 (Future-proofing): 社区可能在未来的版本中赋予这个字段更多的功能,甚至可能直接影响调度。但就目前而言,它更多的是一个描述性、供其他组件消费的字段。
- 声明与识别 (Declaration & Identification): 它是一个明确的元数据字段,用来声明这个 Pod 内的容器是为哪个操作系统构建的(目前是
kubernetes.io/osLabel 打在哪个资源上?kubernetes.io/os是一个 Node Label (节点标签)。它被打在 Node (节点) 资源上。你可以通过以下命令来查看你集群中所有节点的标签:kubectl get nodes --show-labelskubernetes.io/os这个标签主要是由kubelet自动添加的。kubectl describe node [your-node-name] 看到相应的System Info
到底是什么决定了 Pod 分配到对应的操作系统?
真正决定 Pod 被调度到特定操作系统节点上的机制,是 Pod Spec (Pod 规约) 中的调度约束与 Node (节点) 上的标签之间的匹配。
apiVersion: v1
kind: Pod
metadata:
  name: my-windows-pod
spec:
  # 步骤 1: 声明 Pod 的操作系统类型
  # 这本身不影响调度,但是一个好习惯,也为了符合安全策略等。
  os:
    name: windows
 ...
  nodeSelector:
    kubernetes.io/os: windows
为了方便你记忆,我们可以做一个简单的类比:
| 字段/机制 | 功能 | 好比是... |
|---|---|---|
.spec.os.name | 声明 (Declaration) | 包裹上的“内含物品”清单,写着“Windows 软件”。 |
Node Label kubernetes.io/os | 属性 (Attribute) | 每个房门上的标签,写着“本户使用 Windows 系统”或“本户使用 Linux 系统”。 |
Pod nodeSelector | 指令 (Instruction) | 快递单上的“投递要求”,明确指示:“必须投递到使用 Windows 系统的住户”。 |
Pods and controllers
You can use workload resources to create and manage multiple Pods for you.
Here are some examples of workload resources that manage one or more Pods:
Pod templates
PodTemplates are specifications for creating Pods, and are included in workload resources such as Deployments, Jobs, and DaemonSets. The PodTemplate is part of the desired state of whatever workload resource you used to run your app.
the sample:
apiVersion: batch/v1
kind: Job
metadata:
  name: hello
spec:
  template:
    # This is the pod template
    spec:
      containers:
      - name: hello
        image: busybox:1.28
        command: ['sh', '-c', 'echo "Hello, Kubernetes!" && sleep 3600']
      restartPolicy: OnFailure
    # The pod template ends here
Pod update and replacement
Kubernetes doesn't prevent you from managing Pods directly. 虽然 Kubernetes 允许 你直接操作 Pod,但这通常是一种反模式(anti-pattern),主要用于调试或紧急情况。
用edit 交互式去更新:kubectl edit pod [pod-name] ;还可以用patch去更新 kubectl patch pod my-test-pod -p '{"spec":{"activeDeadlineSeconds":60}}'
Resource sharing and communication
pod内的containers共用一个ip, 不同的container如果想要expose端口,只能是不同的。同一pod里面的container用localhost+端口进行通讯
Static Pods
我们平时用 kubectl apply -f my-pod.yaml 创建的 Pod,我们称之为标准 Pod 或 API Server 管理的 Pod。它们的生命周期完全由 Kubernetes 的控制平面(特别是 API Server)来管理。
而静态 Pod则完全不同。
- 定义:静态 Pod 是直接由特定节点上的 Kubelet 守护进程管理的 Pod,它不通过 API Server 进行管理。
- 来源:Kubelet 会监视其所在节点上的一个特定目录(通常是
/etc/kubernetes/manifests)。任何放在这个目录下的标准 Pod 定义 YAML/JSON 文件,都会被 Kubelet 自动识别并创建为静态 Pod。 - 生命周期:
- 创建:将 Pod 的 YAML 文件放入 Kubelet 的监视目录。
- 删除:从该目录中删除 Pod 的 YAML 文件。
- 更新:修改该目录中的 Pod YAML 文件(Kubelet 会自动停止旧的 Pod,并根据新文件启动新的 Pod)。
镜像 Pod (Mirror Pod) 现在我们回到了你问题的核心。既然静态 Pod 不受 API Server 管理,那我们执行 kubectl get pods 时,能看到它们吗?如果看不到,那集群管理员就无法感知到这些关键组件的存在,这会给监控和管理带来麻烦。
- 定义:当 Kubelet 在节点上成功创建了一个静态 Pod 后,它会自动地、主动地在 API Server 上为这个静态 Pod 创建一个对应的、只读的对象。这个在 API Server 上的对象就叫做“镜像 Pod”。
- 目的:它的唯一目的就是让这个静态 Pod 在 Kubernetes 的 API 中可见 (Visible)。
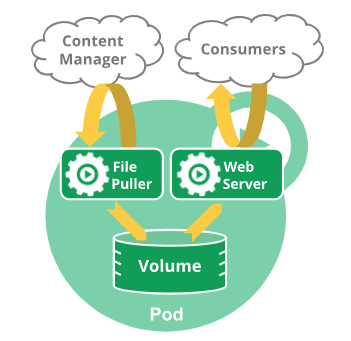
Pods with multiple containers
For example, you might have a container that acts as a web server for files in a shared volume, and a separate sidecar container that updates those files from a remote source, as in the following diagram:
Pod Lifecycle
Pods follow a defined lifecycle, starting in the Pending phase, moving through Running if at least one of its primary containers starts OK, and then through either the Succeeded or Failed phases depending on whether any container in the Pod terminated in failure.
Pod lifetime
Pods are only scheduled once in their lifetime; assigning a Pod to a specific node is called binding, and the process of selecting which node to use is called scheduling.
You can use Pod Scheduling Readiness to delay scheduling for a Pod until all its scheduling gates are removed. For example, you might want to define a set of Pods but only trigger scheduling once all the Pods have been created.
可以定义不同的调度门,在真的被schedule之前需要相就的controller 被这些调度门都删除
Pods and fault recovery
不会把那个旧的、失败的 Pod 实例(identified by a UID)拿起来,拍拍灰尘,然后放到一个新节点上让它继续运行。我们是直接放弃旧的,然后由像 Deployment 这样的控制器创建一个全新的替代品,这个替代品再由调度器找一个新家。
node故障 vs Pod 故障:
| 特性 | 场景 1: 节点宕机 (Node Failure) | 场景 2: Pod 故障 (Pod Failure on Healthy Node) |
|---|---|---|
| 主要处理者 | kube-controller-manager (在控制平面) | kubelet (在工作节点上) |
| 处理对象 | 整个 Pod 对象 | Pod 内部的容器 (Container) |
| 结果 | 旧 Pod 被驱逐/删除;创建全新的 Pod | 在同一个 Pod 内重启容器 |
| Pod UID | 替代品的 UID 是新的 | Pod 的 UID 保持不变 |
| Pod IP 地址 | 替代品的 IP 地址是新的 | Pod 的 IP 地址保持不变 |
| 所在节点 | 替代品被调度到新的健康节点上 | 仍然在原来的节点上 |
| 恢复速度 | 较慢 (分钟级别,有 5 分钟等待期) | 非常快 (秒级) |
kubectl 表现 | 旧 Pod 消失,新 Pod 出现 | 同一个 Pod 的 RESTARTS 计数增加 |
Associated lifetimes
When something is said to have the same lifetime as a Pod, such as a volume, that means that the thing exists as long as that specific Pod (with that exact UID) exists.
这个multi-container Pod 一旦结束生命,那么所关联的Volume也将结束。
Pod phase
Here are the possible values for phase:
| Value | Description |
|---|---|
Pending | The Pod has been accepted by the Kubernetes cluster, but one or more of the containers has not been set up and made ready to run. This includes time a Pod spends waiting to be scheduled as well as the time spent downloading container images over the network. |
Running | The Pod has been bound to a node, and all of the containers have been created. At least one container is still running, or is in the process of starting or restarting. |
Succeeded | All containers in the Pod have terminated in success, and will not be restarted. |
Failed | All containers in the Pod have terminated, and at least one container has terminated in failure. That is, the container either exited with non-zero status or was terminated by the system, and is not set for automatic restarting. |
Unknown | For some reason the state of the Pod could not be obtained. This phase typically occurs due to an error in communicating with the node where the Pod should be running. |
Make sure not to confuse Status, a kubectl display field for user intuition, with the pod's
phase. When a pod is failing to start repeatedly,CrashLoopBackOffmay appear in theStatusfield of some kubectl commands. Similarly, when a pod is being deleted,Terminatingmay appear in theStatusfield of some kubectl commands.
Kubernetes Pod 终止生命周期 (v1.27+) 核心知识点
1. 核心变化:
- 自 K8s v1.27 起,被删除的 Pod 不会从
Terminating状态直接消失。- 它会先根据容器的最终退出码,过渡到一个明确的终端阶段:
Succeeded(所有容器退出码为0) 或Failed(至少一个容器退出码非0)。- 目的:极大增强了 Pod 的可观测性,方便准确追踪一次性任务(如 Job)的最终成败。
2. “终端阶段”停留时长由谁决定?
这个停留时间由两种机制控制,优先级从高到低:
- 机制一 (精确控制 - 推荐):
ttlSecondsAfterFinished
- 配置: 在 Pod 或 Job 的
spec中设置ttlSecondsAfterFinished: <秒数>。- 行为: Pod 到达
Succeeded/Failed状态后,会精确地等待指定的秒数,然后被垃圾回收机制自动删除。- 示例: 设置为
100则保留100秒;设置为0则会立即清理。- 机制二 (集群兜底 - 不精确):
terminated-pod-gc-threshold
- 触发条件: 仅当 Pod 未设置
ttlSecondsAfterFinished时此机制才生效。- 行为: 由集群控制平面 (
kube-controller-manager) 的全局参数--terminated-pod-gc-threshold控制。只有当集群中已终止的 Pod 总数超过此阈值时,才会开始清理最旧的 Pod。- 结论: 停留时间不确定,可能非常久。
3. 最佳实践: 为了可预测地管理 Pod 生命周期并保持集群整洁,应始终为你的一次性任务(尤其是
Job资源)明确设置spec.ttlSecondsAfterFinished。
Container states
There are three possible container states: Waiting, Running, and Terminated.
To check the state of a Pod's containers, you can use kubectl describe pod <name-of-pod>.
Waiting
When you use kubectl to query a Pod with a container that is Waiting, you also see a Reason field to summarize why the container is in that state.
Running
When you use kubectl to query a Pod with a container that is Running, you also see information about when the container entered the Running state.
Terminated
When you use kubectl to query a Pod with a container that is Terminated, you see a reason, an exit code, and the start and finish time for that container's period of execution.
How Pods handle problems with containers
Kubernetes 容器崩溃处理流程总结
| 序号 | 描述 (Description) | 类型 (Type) | 你能看到的 (kubectl) |
|---|---|---|---|
| 1 | 首次崩溃 (Initial crash) | 事件 (Event) | 几乎看不到,一闪而过 |
| 2 | 重复崩溃 (Repeated crashes) | 过程 (Process) | Pod 状态不稳定, RESTARTS 计数增加 |
| 3 | CrashLoopBackOff 状态 (CrashLoopBackOff state) | 状态/原因 (State/Reason) | 明确看到 STATUS 列为 CrashLoopBackOff |
| 4 | 退避重置 (Backoff reset) | 动作 (Action) | 看不到这个动作,但能看到结果:Pod 稳定在 Running 状态 |
To investigate the root cause of a CrashLoopBackOff issue, a user can:
- Check logs: Use
kubectl logs <name-of-pod>to check the logs of the container. This is often the most direct way to diagnose the issue causing the crashes. - Inspect events: Use
kubectl describe pod <name-of-pod>to see events for the Pod, which can provide hints about configuration or resource issues. - Review configuration: Ensure that the Pod configuration, including environment variables and mounted volumes, is correct and that all required external resources are available.
- Check resource limits: Make sure that the container has enough CPU and memory allocated. Sometimes, increasing the resources in the Pod definition can resolve the issue.
- Debug application: There might exist bugs or misconfigurations in the application code. Running this container image locally or in a development environment can help diagnose application specific issues.
Pod-level container restart policy
The spec of a Pod has a restartPolicy field with possible values Always, OnFailure, and Never. The default value is Always.
The restartPolicy for a Pod applies to app containers in the Pod and to regular init containers. Sidecar containers ignore the Pod-level restartPolicy field
After containers in a Pod exit, the kubelet restarts them with an exponential backoff delay (10s, 20s, 40s, …), that is capped at 300 seconds (5 minutes). Once a container has executed for 10 minutes without any problems, the kubelet resets the restart backoff timer for that container.
Pod conditions
A Pod has a PodStatus, which has an array of PodConditions through which the Pod has or has not passed. Kubelet manages the following PodConditions:
PodScheduled: the Pod has been scheduled to a node.PodReadyToStartContainers: (beta feature; enabled by default) the Pod sandbox has been successfully created and networking configured.ContainersReady: all containers in the Pod are ready.Initialized: all init containers have completed successfully.Ready: the Pod is able to serve requests and should be added to the load balancing pools of all matching Services.DisruptionTarget: the pod is about to be terminated due to a disruption (such as preemption, eviction or garbage-collection).PodResizePending: a pod resize was requested but cannot be applied. See Pod resize status.PodResizeInProgress: the pod is in the process of resizing. See Pod resize status.
用kubectl describe pod [pod-name] 来查看。每个condition的都有下面的字段的值,用describe pod来查看的时候,只显示 type, status两个最重要的字段,如果要详细的看可以用kubectl get pod [你的pod名称] -o yaml
| Field name | Description |
|---|---|
type | Name of this Pod condition. |
status | Indicates whether that condition is applicable, with possible values "True", "False", or "Unknown". |
lastProbeTime | Timestamp of when the Pod condition was last probed. |
lastTransitionTime | Timestamp for when the Pod last transitioned from one status to another. |
reason | Machine-readable, UpperCamelCase text indicating the reason for the condition's last transition. |
message | Human-readable message indicating details about the last status transition. |
Pod readiness
Your application can inject extra feedback or signals into PodStatus: Pod readiness. To use this, set readinessGates in the Pod's spec to specify a list of additional conditions that the kubelet evaluates for Pod readiness.
example:
kind: Pod
...
spec:
  readinessGates:
    - conditionType: "www.example.com/feature-1"
status:
  conditions:
    - type: Ready                              # a built in PodCondition
      status: "False"
      lastProbeTime: null
      lastTransitionTime: 2018-01-01T00:00:00Z
    - type: "www.example.com/feature-1"        # an extra PodCondition
      status: "False"
      lastProbeTime: null
      lastTransitionTime: 2018-01-01T00:00:00Z
  containerStatuses:
    - containerID: docker://abcd...
      ready: true
一个 Pod 必须同时满足所有 readinessGates 条件 并且 其自身的 readinessProbe 成功,才会被 Kubernetes 最终标记为 Ready 状态,然后 Service 才会将流量转发给它。ready好了没有,可以用这个来查询。 其中的READY 字段
leite@leite-company ~> kubectl get pods
NAME                                      READY   STATUS    RESTARTS   AGE
springboot3-deployment-559c8cc88b-l6sjg   0/1     Running   0          13s
springboot3-deployment-559c8cc88b-rr22r   0/1     Running   0          13s
Container probes
Check mechanisms
exec(执行命令)
核心思想: 在容器内部执行一个你指定的命令。
成功标准: 该命令执行后的退出码(Exit Code)为
0。任何非0的退出码都被认为是失败。适用场景:
- 当你的应用程序没有提供 HTTP 健康检查接口时。
- 需要检查应用内部的特定状态,例如:检查某个重要文件是否存在 (
cat /tmp/healthy),或者运行一个自定义的健康检查脚本 (/usr/bin/check-health.sh)。 - 非常灵活,可以实现复杂的健康检查逻辑。
示例:
YAML
livenessProbe:
  exec:
    command:
    - cat
    - /tmp/healthy
httpGet(HTTP GET 请求)
核心思想: 向容器的 IP 地址、指定端口和路径发送一个 HTTP GET 请求。
成功标准: 收到的 HTTP 响应状态码(Status Code)大于等于
200且小于400(即2xx或3xx系列)。适用场景:
- 最常用的方式,几乎所有 Web 应用或提供 HTTP API 的服务都适用。
- 通常应用会专门提供一个用于健康检查的端点(endpoint),比如
/healthz或/status。
示例:
YAML
readinessProbe:
  httpGet:
    path: /healthz
    port: 8080
tcpSocket(TCP 套接字)
核心思想: 尝试与容器的指定端口建立一个 TCP 连接。
成功标准: TCP “三次握手”成功,即端口是开放的。只要能成功建立连接,就被认为是健康的,即使连接立即被关闭。
适用场景:
- 适用于那些不提供 HTTP 接口,但监听特定 TCP 端口的服务。
- 例如:数据库(MySQL 监听
3306),缓存服务(Redis 监听6379),或者其他任何基于 TCP 的应用。
示例:
YAML
livenessProbe:
  tcpSocket:
    port: 3306
grpc(gRPC 远程过程调用)
核心思想: 使用 gRPC 协议执行一个远程过程调用。这是比较新且特定的一种方式。
成功标准: 响应的状态是
SERVING。这要求你的应用必须实现 gRPC Health Checking Protocol。适用场景:
- 专门用于基于 gRPC 构建的微服务。
- 如果你的技术栈广泛使用 gRPC,这是一种比
httpGet更原生、更高效的检查方式。
示例:
YAML
ports:
- name: grpc
  port: 9000
livenessProbe:
  grpc:
    port: 9000
Probe outcome
Each probe has one of three results:
SuccessThe container passed the diagnostic.
FailureThe container failed the diagnostic.
UnknownThe diagnostic failed (no action should be taken, and the kubelet will make further checks).
Types of probe
livenessProbe
readinessProbe
readiness probe返回Failure并不会导致容器重启
startupProbe
Startup probes are useful for Pods that have containers that take a long time to come into service.
Indicates whether the application within the container is started. All other probes are disabled if a startup probe is provided, until it succeeds
livenessProbe (存活探针) 和 readinessProbe (就绪探针) 在 startupProbe 首次成功之前,根本不会开始执行。
为什么需要 startupProbe?
想象一个场景:你有一个复杂的 Java 应用,它启动时需要加载大量数据、预热缓存、建立数据库连接池等,整个过程可能需要2到3分钟。
- 如果没有
startupProbe:你可能会配置一个livenessProbe,让它每10秒检查一次应用的健康状况。但由于应用启动需要180秒,这个livenessProbe在前170秒内所有的探测都会是失败的。如果你的failureThreshold(失败阈值) 设置为5,那么在第50秒时 (10秒 * 5次),kubelet 就会认为你的应用已经死了,从而杀死并重启它。这个过程会无限循环,你的应用永远也启动不起来。 - 有了
startupProbe:你可以专门为这个漫长的启动过程配置一个startupProbe。例如,设置一个很长的探测周期和足够高的失败阈值,给它总共5分钟的时间来完成启动。- 在这5分钟内,只有
startupProbe在工作。 livenessProbe和readinessProbe会一直“袖手旁观”。- 一旦
startupProbe探测成功,它就“功成身退”,此后永远不会再执行。 - 紧接着,
livenessProbe和readinessProbe开始接管,分别负责监控容器在运行期间是否健康以及是否准备好接收流量。
- 在这5分钟内,只有
Termination of Pods
If the kubelet or the container runtime's management service is restarted while waiting for processes to terminate, the cluster retries from the start including the full original grace period.
Pod Termination Flow
If the preStop hook is still running after the grace period expires, the kubelet requests a small, one-off grace period extension of 2 seconds.
Forced Pod termination
By default, all deletes are graceful within 30 seconds. The kubectl delete command supports the --grace-period=<seconds> option which allows you to override the default and specify your own value.
Using kubectl, You must specify an additional flag --force along with --grace-period=0 in order to perform force deletions.
Pod shutdown and sidecar containers
If your Pod includes one or more sidecar containers (init containers with an Always restart policy), the kubelet will delay sending the TERM signal to these sidecar containers until the last main container has fully terminated.
Init Containers
Understanding init containers
Init containers are exactly like regular containers, except:
- Init containers always run to completion.
- Each init container must complete successfully before the next one starts.
Differences from regular containers
Regular init containers (in other words: excluding sidecar containers) do not support the lifecycle, livenessProbe, readinessProbe, or startupProbe fields.
sidecar containers continue running during a Pod's lifetime, and do support some probes.
Differences from sidecar containers
Unlike sidecar containers, init containers are not continuously running alongside the main containers.
init containers do not support lifecycle, livenessProbe, readinessProbe, or startupProbe whereas sidecar containers support all these probes to control their lifecycle.
Detailed behavior
However, if the Pod restartPolicy is set to Always, the init containers use restartPolicy OnFailure.
即使pod的restartPolicy是always, 但对于init containers来说其实相当于Onfaiure.
A Pod that is initializing is in the Pending state but should have a condition Initialized set to false.
If the Pod restarts, or is restarted, all init containers must execute again.
Because init containers can be restarted, retried, or re-executed, init container code should be idempotent.
However, Kubernetes prohibits readinessProbe from being used because init containers cannot define readiness distinct from completion.
However it is recommended to use activeDeadlineSeconds only if teams deploy their application as a Job, because activeDeadlineSeconds has an effect even after initContainer finished.
Resource sharing within containers
- 核心概念:
Effective Init Request/Limit
- 定义: 它是 Kubernetes 计算出的一个中间值,代表
init阶段对单一资源(如memory或cpu)的最大需求。 - 计算方法: 取所有
init容器中,对同一种资源(cpu或memory)设置的request或limit的最大值。Effective Init Request=MAX(init_container_1_request, init_container_2_request, ...)Effective Init Limit=MAX(init_container_1_limit, init_container_2_limit, ...)
Pod 最终资源规格的计算规则
Pod 启动所需的资源,必须同时满足
init容器(轮流执行)和main容器(同时执行)的需求。
- Pod 总请求 (Request) =
MAX( 所有主容器请求之和 , Effective Init Request ) - Pod 总限制 (Limit) =
MAX( 所有主-容器限制之和 , Effective Init Limit )
- 关键要点与边界情况
- 独立计算:
cpu和memory两种资源的request和limit是完全分开独立计算的。 - 主容器优先: 如果任何一个主容器没有设置
limit,那么整个 Pod 的limit就是无限制的。init容器设置的limit无法约束主容器。 - 影响 QoS: 未设置
limit会导致 Pod 的 QoS 等级降为Burstable,在节点资源紧张时有被驱逐的风险。 - 调度依据: Pod 的总请求 (
Pod Total Request) 是调度器 (kube-scheduler) 在为 Pod 选择节点时的重要依据。
Pod restart reasons
| 场景 | 核心触发事件 | Init 记录丢失的角色 | Pod 是否重启 | Init 容器是否重新运行 |
|---|---|---|---|---|
| 第一种 | 主容器全部终止 | 附加条件 | 是 | 是(在 Pod 重启流程中) |
| 第二种 | 仅 Init 记录丢失 | 唯一事件 | 否 | 否 |
Sidecar Containers
Sidecar containers in Kubernetes
These restartable sidecar containers are independent from other init containers and from the main application container(s) within the same pod. These can be started, stopped, or restarted without affecting the main application container and other init containers.
Example:
apiVersion: apps/v1
kind: Deployment
metadata:
  name: myapp
  labels:
    app: myapp
spec:
  replicas: 1
  selector:
    matchLabels:
      app: myapp
  template:
    metadata:
      labels:
        app: myapp
    spec:
      containers:
        - name: myapp
          image: alpine:latest
          command: ['sh', '-c', 'while true; do echo "logging" >> /opt/logs.txt; sleep 1; done']
          volumeMounts:
            - name: data
              mountPath: /opt
      initContainers:
        - name: logshipper
          image: alpine:latest
          restartPolicy: Always
          command: ['sh', '-c', 'tail -F /opt/logs.txt']
          volumeMounts:
            - name: data
              mountPath: /opt
      volumes:
        - name: data
          emptyDir: {}
Sidecar containers and Pod lifecycle
If an init container is created with its restartPolicy set to Always, it will start and remain running during the entire life of the Pod.
After a sidecar-style init container is running (the kubelet has set the started status for that init container to true), the kubelet then starts the next init container from the ordered .spec.initContainers list.
具体来说,它的完整路径是 pod.status.initContainerStatuses[].started。 sidecar container启动后可能会一直处于running状态[而不是正常的init container中的等前一个init container的state变为terminated再启动下一个],但它不会影响下一个init container的正常启动,因为这个
....started的状态值为true这不是一个你会用 kubectl get pods 直接看到的顶层状态,而是需要查看 Pod 的详细 YAML 或 JSON 描述才能找到的内部状态.
Jobs with sidecar containers
If you define a Job that uses sidecar using Kubernetes-style init containers, the sidecar container in each Pod does not prevent the Job from completing after the main container has finished.
Sidecar 容器本身将不再成为判断 Pod 是否成功完成的阻碍。
Differences from application containers
So exit codes different from 0 (0 indicates successful exit), for sidecar containers are normal on Pod termination and should be generally ignored by the external tooling.
Differences from init containers
Sidecar containers run concurrently with the main application container.
Sidecar containers can interact directly with the main application containers, because like init containers they always share the same network, and can optionally also share volumes (filesystems).
Init containers stop before the main containers start up, so init containers cannot exchange messages with the app container in a Pod. Any data passing is one-way (for example, an init container can put information inside an emptyDir volume).
Ephemeral Containers
A special type of container that runs temporarily in an existing Pod to accomplish user-initiated actions such as troubleshooting. You use ephemeral containers to inspect services rather than to build applications.
Note:
Ephemeral containers are not supported by static pods.
Ephemeral containers are created using a special ephemeralcontainers handler in the API rather than by adding them directly to pod.spec, so it's not possible to add an ephemeral container using kubectl edit.
可以使用 kubectl debug 命令来附加一个临时容器:
# 语法: kubectl debug -it <pod-name> --image=<debug-image> --target=<app-container-name> -- <command>

# 附加一个 busybox 容器,并启动一个交互式的 shell
kubectl debug -it my-app-pod --image=busybox --target=my-app-container

# 进入 shell 后,你就位于 my-app-pod 的网络环境中了
# 你可以...
# 检查网络连接
/ # ping google.com

# 检查应用容器的端口是否在监听 (假设应用跑在 80 端口)
/ # wget -qO- localhost:80

# 查看所有进程 (如果开启了进程共享)
/ # ps aux
当你执行 kubectl debug 后,如果你去查看 Pod 的 YAML 定义,你会发现多了一个 ephemeralContainers 字段,里面描述了你刚刚添加的 busybox 容器。
Disruptions
This guide is for application owners who want to build highly available applications, and thus need to understand what types of disruptions can happen to Pods.
Voluntary and involuntary disruptions
We call these unavoidable cases involuntary disruptions to an application. Examples are:
- a hardware failure of the physical machine backing the node
- cluster administrator deletes VM (instance) by mistake
- cloud provider or hypervisor failure makes VM disappear
- a kernel panic
- the node disappears from the cluster due to cluster network partition
- eviction of a pod due to the node being out-of-resources.
We call other cases voluntary disruptions. These include both actions initiated by the application owner and those initiated by a Cluster Administrator. Typical application owner actions include:
- deleting the deployment or other controller that manages the pod
- updating a deployment's pod template causing a restart
- directly deleting a pod (e.g. by accident)
Cluster administrator actions include:
- Draining a node for repair or upgrade.
- Draining a node from a cluster to scale the cluster down (learn about Node Autoscaling).
- Removing a pod from a node to permit something else to fit on that node.
Dealing with disruptions
Here are some ways to mitigate involuntary disruptions:
- Ensure your pod requests the resources it needs.
- Replicate your application if you need higher availability. (Learn about running replicated stateless and stateful applications.)
- For even higher availability when running replicated applications, spread applications across racks (using anti-affinity) or across zones (if using a multi-zone cluster.)
Pod disruption budgets
As an application owner, you can create a PodDisruptionBudget (PDB) for each application. A PDB limits the number of Pods of a replicated application that are down simultaneously from voluntary disruptions.
A PDB specifies the number of replicas that an application can tolerate having, relative to how many it is intended to have. For example, a Deployment which has a .spec.replicas: 5 is supposed to have 5 pods at any given time. If its PDB allows for there to be 4 at a time, then the Eviction API will allow voluntary disruption of one (but not two) pods at a time.
It is recommended to set AlwaysAllow Unhealthy Pod Eviction Policy to your PodDisruptionBudgets to support eviction of misbehaving applications during a node drain. The default behavior is to wait for the application pods to become healthy before the drain can proceed.
example:
apiVersion: policy/v1
kind: PodDisruptionBudget
metadata:
  name: my-app-pdb
spec:
  minAvailable: 2
  selector:
    matchLabels:
      app: my-app
  # 关键配置在这里!
  unhealthyPodEvictionPolicy: AlwaysAllow
| 策略 | IfHealthyBudget (默认) | AlwaysAllow |
|---|---|---|
| 优点 | 对应用更“安全”,尽最大努力保证健康实例的数量。 | 优先保障集群运维,不会因为单个应用的故障而阻塞节点维护、升级等重要操作。 |
| 缺点 | 可能阻塞节点排空,导致集群运维工作无法进行。 | 如果应用的大多数实例都不健康,drain 操作可能会驱逐掉最后几个健康的实例,可能导致服务短暂中断。 |
| 适用场景 | 极少数情况下,如果应用的健康比集群的可维护性更重要,且应用本身非常稳定。 | 绝大多数场景的推荐做法。它遵循一个重要的运维理念:应用的故障应该由应用自身解决(例如通过控制器重建),而不应该影响到整个基础设施的管理。 |
Pod disruption conditions
[与 Pod conditions 关联](#Pod conditions)
A dedicated Pod DisruptionTarget condition is added to indicate that the Pod is about to be deleted due to a disruption. The reason field of the condition additionally indicates one of the following reasons for the Pod termination:
PreemptionBySchedulerPod is due to be preempted by a scheduler in order to accommodate a new Pod with a higher priority. For more information, see Pod priority preemption.
DeletionByTaintManagerPod is due to be deleted by Taint Manager (which is part of the node lifecycle controller within
kube-controller-manager) due to aNoExecutetaint that the Pod does not tolerate; see taint-based evictions.EvictionByEvictionAPIPod has been marked for eviction using the Kubernetes API .
DeletionByPodGCPod, that is bound to a no longer existing Node, is due to be deleted by Pod garbage collection.
TerminationByKubeletPod has been terminated by the kubelet, because of either node pressure eviction, the graceful node shutdown, or preemption for system critical pods
When using a Job (or CronJob), you may want to use these Pod disruption conditions as part of your Job's Pod failure policy.
Pod hostname
Default Pod hostname
apiVersion: v1
kind: Pod
metadata:
  name: busybox-1
spec:
  containers:
  - image: busybox:1.28
    command:
      - sleep
      - "3600"
    name: busybox
The Pod created by this manifest will have its hostname and fully qualified domain name (FQDN) set to busybox-1.
Hostname with pod's hostname and subdomain fields
The Pod spec includes an optional hostname field. When set, this value takes precedence over the Pod's metadata.name as the hostname (observed from within the Pod).
When both hostname and subdomain are set, the cluster's DNS server will create A and/or AAAA records based on these fields.
Hostname with pod's setHostnameAsFQDN fields
When both setHostnameAsFQDN: true and the subdomain field is set in the Pod spec, the kubelet writes the Pod's FQDN into the hostname for that Pod's namespace. In this case, both hostname and hostname --fqdn return the Pod's FQDN.
Note: In Linux, the hostname field of the kernel (the nodename field of struct utsname) is limited to 64 characters.
If a Pod enables this feature and its FQDN is longer than 64 character, it will fail to start. The Pod will remain in Pending status (ContainerCreating as seen by kubectl) generating error events, such as "Failed to construct FQDN from Pod hostname and cluster domain".
This means that when using this field, you must ensure the combined length of the Pod's metadata.name (or spec.hostname) and spec.subdomain fields results in an FQDN that does not exceed 64 characters.
Pod QoS classes
Quality of Service classes
Kubernetes assigns every Pod a QoS class based on the resource requests and limits of its component Containers. QoS classes are used by Kubernetes to decide which Pods to evict from a Node experiencing Node Pressure. The possible QoS classes are Guaranteed, Burstable, and BestEffort. When a Node runs out of resources, Kubernetes will first evict BestEffort Pods running on that Node, followed by Burstable and finally Guaranteed Pods.
Guaranteed(最高优先级)- 条件: Pod 中的每一个容器都必须同时设置了 CPU 和内存的
requests和limits,并且对于每一种资源,requests的值必须严格等于limits的值。 - 特点: 这些 Pod 的资源需求是完全可预测的。只要不超过
limits,它们就能获得所请求的资源。在节点资源紧张时,这类 Pod 最后才会被驱逐。
- 条件: Pod 中的每一个容器都必须同时设置了 CPU 和内存的
BestEffort(最低优先级)- 条件: Pod 中的任何一个容器都没有设置任何
requests或limits。 - 特点: 这些 Pod 没有任何资源保障,它们会使用节点上一切可用的空闲资源。当节点资源紧张时,这类 Pod 是最先被驱逐的。
- 条件: Pod 中的任何一个容器都没有设置任何
Burstable(中等优先级)- 条件: Pod 不满足
Guaranteed和BestEffort的任何一个条件。换句话说,只要 Pod 中至少有一个容器设置了requests,但又不完全满足Guaranteed的严格要求,它就是Burstable。 - 特点: 这类 Pod 获得了一定程度的资源保障(由
requests保证),同时允许在节点资源有富余时,使用超过其requests的资源,最多不能超过其limits(如果设置了的话)。在资源紧张时,它们的驱逐优先级介于Guaranteed和BestEffort之间。
- 条件: Pod 不满足
Some behavior is independent of QoS class
For example:
- Any Container exceeding a resource limit will be killed and restarted by the kubelet without affecting other Containers in that Pod.
- If a Container exceeds its resource request and the node it runs on faces resource pressure, the Pod it is in becomes a candidate for eviction. If this occurs, all Containers in the Pod will be terminated. Kubernetes may create a replacement Pod, usually on a different node.
- The resource request of a Pod is equal to the sum of the resource requests of its component Containers, and the resource limit of a Pod is equal to the sum of the resource limits of its component Containers.
- The kube-scheduler does not consider QoS class when selecting which Pods to preempt. Preemption can occur when a cluster does not have enough resources to run all the Pods you defined.
Downward API
There are two ways to expose Pod and container fields to a running container: environment variables, and as files that are populated by a special volume type. Together, these two ways of exposing Pod and container fields are called the downward API.
Available fields
You can pass information from available Pod-level fields using fieldRef. fieldRef
You can pass information from available Container-level fields using resourceFieldRef.
Workload management
Deployments
Creating a Deployment
Do not manage ReplicaSets owned by a Deployment.
Do not overlap labels or selectors with other controllers (including other Deployments and StatefulSets).
不要让不同的控制器[[实例](Controller)使用可以匹配到同一批 Pod 的选择器(Selector)
The
pod-template-hashlabel is added by the Deployment controller to every ReplicaSet that a Deployment creates or adopts.
Updating a Deployment
If the Deployment is updated, the existing ReplicaSet that controls Pods whose labels match .spec.selector but whose template does not match .spec.template is scaled down.
ReplicaSet去控制 selector没有变的; .spec.template变化了
Label selector updates
Selector additions require the Pod template labels in the Deployment spec to be updated with the new label too, otherwise a validation error is returned. This change is a non-overlapping one, meaning that the new selector does not select ReplicaSets and Pods created with the old selector, resulting in orphaning all old ReplicaSets and creating a new ReplicaSet.
如果selctor增加了新的label, 对应的
spec.template.metadata.labels也要加上这个新的label. 更新后旧的ReplicaSets并不会自动被清除Selector updates changes the existing value in a selector key -- result in the same behavior as additions.
Selector removals removes an existing key from the Deployment selector -- do not require any changes in the Pod template labels. Existing ReplicaSets are not orphaned, and a new ReplicaSet is not created, but note that the removed label still exists in any existing Pods and ReplicaSets.
Rolling Back a Deployment
when you roll back to an earlier revision, only the Deployment's Pod template part is rolled back.
不会改变的: 你手动设置的副本数 replicas: 5 不会回滚到初始的 3。因为 replicas 字段不属于 .spec.template (Pod 模板) 的一部分。它属于 Deployment 的控制器策略。
Checking Rollout History of a Deployment
check the revisions of this Deployment:
kubectl rollout history deployment/nginx-deployment
To see the details of each revision, run:
kubectl rollout history deployment/nginx-deployment --revision=2
Rolling Back to a Previous Revision
decided to undo the current rollout and rollback to the previous revision:
kubectl rollout undo deployment/nginx-deployment
you can rollback to a specific revision by specifying it with --to-revision:
kubectl rollout undo deployment/nginx-deployment --to-revision=2
Scaling a Deployment
Proportional scaling
比例扩容是指,当一个正在进行版本更新的 Deployment 需要扩容时,Kubernetes 不会把所有的新增 Pod 都创建成新版本,而是会按照当前新旧版本的 Pod 数量比例,来分配这些新增的 Pod。 按比例新增完以后,再升级到新的版本
- 只有在滚动更新的特定窗口期内,比例扩容机制才会被激活和使用
Pausing and Resuming a rollout of a Deployment
当一个 Deployment 的发布(rollout)被暂停(paused)后,你对其模板(template)所做的任何后续更改,例如使用 kubectl set image 更新镜像,都仅仅是更新了 Deployment 这个对象在 Kubernetes API Server 中的定义(Spec)。然而,Deployment Controller(控制器)因为收到了“暂停”指令,所以它不会触发任何实际的滚动更新操作。也就是说,它不会去创建新的 ReplicaSet,也不会用新镜像去创建新的 Pod。
只有当你执行 kubectl rollout resume 命令后,Deployment Controller 才会解除暂停状态,然后它会去比较当前的活动状态和你在暂停期间所做的全部修改后的期望状态(Desired State)
- 这种“暂停-修改-恢复”的机制非常有用,它为我们提供了一个窗口期,让我们可以在一个发布周期内安全地应用多个变更,而不是每做一个小改动就触发一次滚动更新。
StatefulSets
Using StatefulSets
StatefulSets are valuable for applications that require one or more of the following.
- Stable, unique network identifiers.
- Stable, persistent storage.
- Ordered, graceful deployment and scaling.
- Ordered, automated rolling updates.
In the above, stable is synonymous with persistence across Pod (re)scheduling.
Limitations
Deleting and/or scaling a StatefulSet down will not delete the volumes associated with the StatefulSet.
StatefulSets currently require a Headless Service to be responsible for the network identity of the Pods. You are responsible for creating this Service.
StatefulSets do not provide any guarantees on the termination of pods when a StatefulSet is deleted. To achieve ordered and graceful termination of the pods in the StatefulSet, it is possible to scale the StatefulSet down to 0 prior to deletion.
Kubernetes 会立即开始清理其所属的 Pods,但这个过程不保证顺序,也不保证 Pods 能优雅地关闭
StatefulSets do not provide any guarantees on the termination of pods when a StatefulSet is deleted. To achieve ordered and graceful termination of the pods in the StatefulSet, it is possible to scale the StatefulSet down to 0 prior to deletion.
Example
apiVersion: v1
kind: Service
metadata:
  name: nginx
  labels:
    app: nginx
spec:
  ports:
  - port: 80
    name: web
  clusterIP: None
  selector:
    app: nginx
---
apiVersion: apps/v1
kind: StatefulSet
metadata:
  name: web
spec:
  selector:
    matchLabels:
      app: nginx # has to match .spec.template.metadata.labels
  serviceName: "nginx"
  replicas: 3 # by default is 1
  minReadySeconds: 10 # by default is 0
  template:
    metadata:
      labels:
        app: nginx # has to match .spec.selector.matchLabels
    spec:
      terminationGracePeriodSeconds: 10
      containers:
      - name: nginx
        image: registry.k8s.io/nginx-slim:0.24
        ports:
        - containerPort: 80
          name: web
        volumeMounts:
        - name: www
          mountPath: /usr/share/nginx/html
  volumeClaimTemplates:
  - metadata:
      name: www
    spec:
      accessModes: [ "ReadWriteOnce" ]
      storageClassName: "my-storage-class"
      resources:
        requests:
          storage: 1Gi
Pod Identity
StatefulSet Pods have a unique identity that consists of an ordinal, a stable network identity, and stable storage. The identity sticks to the Pod, regardless of which node it's (re)scheduled on.
Ordinal Index
For a StatefulSet with N replicas, each Pod in the StatefulSet will be assigned an integer ordinal, that is unique over the Set. By default, pods will be assigned ordinals from 0 up through N-1. The StatefulSet controller will also add a pod label with this index: apps.kubernetes.io/pod-index.
Start ordinal
.spec.ordinals.start: If the.spec.ordinals.startfield is set, Pods will be assigned ordinals from.spec.ordinals.startup through.spec.ordinals.start + .spec.replicas - 1.
Stable Network ID
how that affects the DNS names for the StatefulSet's Pods.
| Cluster Domain | Service (ns/name) | StatefulSet (ns/name) | StatefulSet Domain | Pod DNS | Pod Hostname |
|---|---|---|---|---|---|
| cluster.local | default/nginx | default/web | nginx.default.svc.cluster.local | web-{0..N-1}.nginx.default.svc.cluster.local | web-{0..N-1} |
| cluster.local | foo/nginx | foo/web | nginx.foo.svc.cluster.local | web-{0..N-1}.nginx.foo.svc.cluster.local | web-{0..N-1} |
| kube.local | foo/nginx | foo/web | nginx.foo.svc.kube.local | web-{0..N-1}.nginx.foo.svc.kube.local | web-{0..N-1} |
Stable Storage
Pod 的调度位置不会影响 StatefulSet 创建的 PV 数量。只要 replicas: 3 并且定义了 volumeClaimTemplates,就一定会创建 3 个 PVC,进而触发创建 3 个 PV,无论这些 Pod 最终在哪里运行。
Note that, the PersistentVolumes associated with the Pods' PersistentVolume Claims are not deleted when the Pods, or StatefulSet are deleted. This must be done manually.
Pod Name Label
When the StatefulSet controller creates a Pod, it adds a label, statefulset.kubernetes.io/pod-name, that is set to the name of the Pod. This label allows you to attach a Service to a specific Pod in the StatefulSet.
Deployment and Scaling Guarantees
- For a StatefulSet with N replicas, when Pods are being deployed, they are created sequentially, in order from {0..N-1}.
- When Pods are being deleted, they are terminated in reverse order, from {N-1..0}.
- Before a scaling operation is applied to a Pod, all of its predecessors must be Running and Ready.
- Before a Pod is terminated, all of its successors must be completely shutdown.
The StatefulSet should not specify a pod.Spec.TerminationGracePeriodSeconds of 0.
Pod Management Policies
via its .spec.podManagementPolicy field.
OrderedReadypod management is the default for StatefulSets.Parallelpod management tells the StatefulSet controller to launch or terminate all Pods in parallel
Update strategies
There are two possible values for a StatefulSet's .spec.updateStrategy field.
OnDeleteWhen a StatefulSet's
.spec.updateStrategy.typeis set toOnDelete, the StatefulSet controller will not automatically update the Pods in a StatefulSet. Users must manually delete Pods to cause the controller to create new Pods that reflect modifications made to a StatefulSet's.spec.template.RollingUpdateThe
RollingUpdateupdate strategy implements automated, rolling updates for the Pods in a StatefulSet. This is the default update strategy.
Rolling Updates
When a StatefulSet's .spec.updateStrategy.type is set to RollingUpdate, the StatefulSet controller will delete and recreate each Pod in the StatefulSet. It will proceed in the same order as Pod termination (from the largest ordinal to the smallest), updating each Pod one at a time.
Partitioned rolling updates
The RollingUpdate update strategy can be partitioned, by specifying a .spec.updateStrategy.rollingUpdate.partition.
partition(分区)是Kubernetes StatefulSet中RollingUpdate(滚动更新)策略的一个核心属性。它允许你对有状态应用(如数据库)进行部分更新或阶段性发布。
它的工作原理是充当一个“分界线”,将所有Pod副本根据其序号(ordinal,即pod-0, pod-1...)分为两个集合:
- “更新区” (Update Zone):
- 规则: 序号 **大于或等于 **
partition值的Pod。 - 行为: 当你更新StatefulSet的Pod模板(
.spec.template,例如更换镜像)时,这个区域的Pod会被自动滚动更新到新版本。
- 规则: 序号 **大于或等于 **
- “锁定区” (Locked Zone):
- 规则: 序号 小于
partition值的Pod。 - 行为: 这个区域的Pod不会被更新,它们会被“锁定”在当前(旧的)版本。
- 关键保护机制: 即使你手动删除一个“锁定区”的Pod,Kubernetes也会使用旧版本的模板来重建它,以防止意外升级。
- 规则: 序号 小于
Revision history
Control retained revisions with .spec.revisionHistoryLimit:
apiVersion: apps/v1
kind: StatefulSet
metadata:
  name: webapp
spec:
  revisionHistoryLimit: 5  # Keep last 5 revisions
You can revert to a previous configuration using:
# View revision history
kubectl rollout history statefulset/webapp

# Rollback to a specific revision
kubectl rollout undo statefulset/webapp --to-revision=3
To view associated ControllerRevisions:
# List all revisions for the StatefulSet
kubectl get controllerrevisions -l app.kubernetes.io/name=webapp

# View detailed configuration of a specific revision
kubectl get controllerrevision/webapp-3 -o yaml
PersistentVolumeClaim retention
The optional .spec.persistentVolumeClaimRetentionPolicy field controls if and how PVCs are deleted during the lifecycle of a StatefulSet.
这个策略下有两个子策略,它们控制着不同场景下的 PVC 行为:
whenDeleted- 触发时机: 当整个 StatefulSet 资源被删除时(例如,你执行了
kubectl delete statefulset my-app)。 - 控制对象: 所有由这个 StatefulSet 创建的 PVC。
- 触发时机: 当整个 StatefulSet 资源被删除时(例如,你执行了
whenScaled- 触发时机: 当 StatefulSet 的副本数(
replicas)被调小时(即“缩容”,例如从 5 个副本缩减到 3 个副本)。 - 控制对象: 仅仅那些因缩容而被删除的 Pod 所对应的 PVC(在上面的例子中,就是
my-app-4和my-app-3对应的 PVC)。
- 触发时机: 当 StatefulSet 的副本数(
策略的两个选项 对于上述的每一种场景,你都有两种行为选项:
Retain(默认值)- 含义: 保留。
- 行为: 这就是 Kubernetes 的经典行为。即使 Pod 被删除,PVC 也会被保留在集群中。
- 适用场景: 生产环境的数据库、关键数据存储。数据的安全性是第一位的。
Delete- 含义: 删除。
- 行为: 当关联的 Pod 被终止之后,Kubernetes 会自动删除该 PVC。
- 适用场景:
- 开发/测试环境:快速清理资源,避免垃圾堆积。
- 数据可再生应用:例如一个分布式缓存集群,缓存数据丢失后可以重新生成。
- 临时数据处理:Pod 只是用 PVC 做临时落地,Pod 没了数据也就不需要了。
DaemonSet
Writing a DaemonSet Spec
Create a DaemonSet
apiVersion: apps/v1
kind: DaemonSet
metadata:
  name: fluentd-elasticsearch
  namespace: kube-system
  labels:
    k8s-app: fluentd-logging
spec:
  selector:
    matchLabels:
      name: fluentd-elasticsearch
  template:
    metadata:
      labels:
        name: fluentd-elasticsearch
    spec:
      tolerations:
      # these tolerations are to have the daemonset runnable on control plane nodes
      # remove them if your control plane nodes should not run pods
      - key: node-role.kubernetes.io/control-plane
        operator: Exists
        effect: NoSchedule
      - key: node-role.kubernetes.io/master
        operator: Exists
        effect: NoSchedule
      containers:
      - name: fluentd-elasticsearch
        image: quay.io/fluentd_elasticsearch/fluentd:v5.0.1
        resources:
          limits:
            memory: 200Mi
          requests:
            cpu: 100m
            memory: 200Mi
        volumeMounts:
        - name: varlog
          mountPath: /var/log
      # it may be desirable to set a high priority class to ensure that a DaemonSet Pod
      # preempts running Pods
      # priorityClassName: important
      terminationGracePeriodSeconds: 30
      volumes:
      - name: varlog
        hostPath:
          path: /var/log
Running Pods on select Nodes
if you specify a .spec.template.spec.affinity, then DaemonSet controller will create Pods on nodes which match that node affinity. If you do not specify either, then the DaemonSet controller will create Pods on all nodes.
How Daemon Pods are scheduled
A DaemonSet can be used to ensure that all eligible nodes run a copy of a Pod. The DaemonSet controller creates a Pod for each eligible node and adds the spec.affinity.nodeAffinity field of the Pod to match the target host. After the Pod is created, the default scheduler typically takes over and then binds the Pod to the target host by setting the .spec.nodeName field. If the new Pod cannot fit on the node, the default scheduler may preempt (evict) some of the existing Pods based on the priority of the new Pod.
抢占行为完全是基于优先级 (Priority) 的,而优先级是通过 PriorityClass 来定义的
Taints and tolerations
The DaemonSet controller automatically adds a set of tolerations to DaemonSet Pods:
| Toleration key | Effect | Details |
|---|---|---|
node.kubernetes.io/not-ready | NoExecute | DaemonSet Pods can be scheduled onto nodes that are not healthy or ready to accept Pods. Any DaemonSet Pods running on such nodes will not be evicted. |
node.kubernetes.io/unreachable | NoExecute | DaemonSet Pods can be scheduled onto nodes that are unreachable from the node controller. Any DaemonSet Pods running on such nodes will not be evicted. |
node.kubernetes.io/disk-pressure | NoSchedule | DaemonSet Pods can be scheduled onto nodes with disk pressure issues. |
node.kubernetes.io/memory-pressure | NoSchedule | DaemonSet Pods can be scheduled onto nodes with memory pressure issues. |
node.kubernetes.io/pid-pressure | NoSchedule | DaemonSet Pods can be scheduled onto nodes with process pressure issues. |
node.kubernetes.io/unschedulable | NoSchedule | DaemonSet Pods can be scheduled onto nodes that are unschedulable. |
node.kubernetes.io/network-unavailable | NoSchedule | Only added for DaemonSet Pods that request host networking, i.e., Pods having spec.hostNetwork: true. Such DaemonSet Pods can be scheduled onto nodes with unavailable network. |
You can add your own tolerations to the Pods of a DaemonSet as well, by defining these in the Pod template of the DaemonSet.
📝 Taint Effect:
NoExecute核心笔记
NoExecute是 Taint(污点)三种效果中最“强力”的一种,它的核心是驱逐(Eviction)。
- 核心功能:驱逐正在运行的 Pod
- 触发条件:当一个 Node 被添加
effect: NoExecute的 Taint。- 立即执行:K8s 会立即检查该 Node 上所有正在运行的 Pod。
- 驱逐对象:所有没有匹配此 Taint 的
toleration(容忍)的 Pod,都会立刻被启动驱逐流程。- 新 Pod 调度:
NoExecute效果也包含了NoSchedule的功能,即新的 Pod 也无法调度到这个 Node 上(除非它们有匹配的 Toleration)。
- 驱逐过程:优雅终止 (Graceful)
驱逐并非瞬时的强制杀死(
kill -9):
- Pod 状态变为
Terminating。- Kubelet 开始执行 Pod 的终止宽限期(
terminationGracePeriodSeconds,默认 30s)。- Pod 进程收到
SIGTERM信号,有机会“优雅地”关闭。- 宽限期结束后,如果 Pod 仍未退出,才会被
SIGKILL强制终止。- 与此同时,Deployment 等控制器会在其他可用节点上创建新的替代 Pod。
- 关键配置:
tolerationSeconds
tolerationSeconds是NoExecute容忍中一个极其重要的可选配置。
- 目的:允许 Pod "临时容忍"一个
NoExecuteTaint 一段时间,而不是立即被驱逐。- 工作方式:
- Pod 必须有匹配的
toleration才能使用此配置。- 当 Node 出现
NoExecuteTaint 时(例如node.kubernetes.io/unreachable),计时开始。- Pod 会继续运行
tolerationSeconds所指定的秒数。- Taint 消失:如果 Taint 在倒计时结束前被移除(如 Node 恢复),Pod 会继续正常运行,不会被驱逐。
- Taint 持续:如果倒计时结束,Taint 仍然存在,Pod 将被启动驱逐流程。
- 典型用例:常用于
StatefulSet,防止因短暂的网络分区(Node 暂时NotReady)导致 Pod 被立即驱逐,从而避免有状态应用的数据和服务中断。
Updating a DaemonSet
If node labels are changed, the DaemonSet will promptly add Pods to newly matching nodes and delete Pods from newly not-matching nodes.
You can delete a DaemonSet. If you specify --cascade=orphan with kubectl, then the Pods will be left on the nodes. If you subsequently create a new DaemonSet with the same selector, the new DaemonSet adopts the existing Pods.
Jobs
Running an example Job
apiVersion: batch/v1
kind: Job
metadata:
  name: pi
spec:
  ttlSecondsAfterFinished: 60  # 任务完成后 60 秒自动删除 Job 和 Pod
  template:
    spec:
      containers:
      - name: pi
        image: perl:5.34.0
        command: ["perl",  "-Mbignum=bpi", "-wle", "print bpi(2000)"]
      restartPolicy: Never
  backoffLimit: 4
Check on the status of the Job with kubectl:
kubectl describe job pi
Writing a Job spec
Job Labels
Job labels will have batch.kubernetes.io/ prefix for job-name and controller-uid.
Pod Template
Only a RestartPolicy equal to Never or OnFailure is allowed.
Pod selector
默认情况下不应指定 (.spec.selector)
如果用户决定覆盖默认逻辑并自定义 Pod 选择器,必须非常谨慎。以下风险:
• 标签冲突:如果你指定的标签选择器不是唯一的,且匹配到了其他 Job 的 Pod,可能会导致非预期行为。
• 错误的 Pod 管理:
◦ 属于其他 Job 的 Pod 可能会被误删。
◦ 该 Job 可能会将其他不相关的 Pod 计入自己的完成计数。
◦ 一个或多个 Job 可能会因此拒绝创建 Pod 或无法运行至完成。
• 级联影响:非唯一的选择器还可能导致其他控制器(如 ReplicationController)及其 Pod 表现出不可预测的行为。
• 缺乏拦截:Kubernetes 不会阻止用户在指定
.spec.selector时犯错
Parallel execution for Jobs
- 非并行 Job (Non-parallel Job)
这是最简单、最常见的 Job 类型,通常用于执行一次性的运维任务。
- 核心特征:
- 通常只启动 一个 Pod。
- 只要这个 Pod 成功终止(Exit Code 0),整个 Job 就视为完成。
- 配置方式:
.spec.completions:不设置(默认为 1)。.spec.parallelism:不设置(默认为 1)。
- 适用场景:
- 数据库迁移脚本 (Database Migration)。
- 一次性的备份任务。
- 固定完成计数 (Fixed Completion Count)
当你有一堆任务需要处理,并且你明确知道任务的总量时使用此模式。
- 核心特征:
- 需要设置一个非零的正整数作为目标。
- Job Controller 会不断创建 Pod,直到累计有指定数量(
.spec.completions)的 Pod 成功退出。
- 配置方式:
.spec.completions:设置为 N (非零正值)。parallelism: 设置每次允许 N 个 Pod 并行跑
- 完成模式 (Completion Mode) - K8s v1.21+:
- NonIndexed (默认):
- Pod 的完成是同质的(Homogenous)。也就是说,Pod A 完成和 Pod B 完成没有区别,只是计数器 +1。
- Indexed (索引模式):
- 核心概念:每个 Pod 会获得一个从
0到N-1的唯一索引。 - 获取索引方式:程序可以通过 Pod 的 Annotation、Label、Hostname 或 环境变量 (
JOB_COMPLETION_INDEX) 获取当前处理的是第几个任务。 - 完成条件:每个索引(0, 1, ... N-1)都必须有一个对应的 Pod 成功完成。
- 适用场景:静态分片处理。例如,有 10 个大文件需要转码,你可以启动 10 个 Job Pod,Pod-0 处理
file-0.mp4,Pod-1 处理file-1.mp4。
- 核心概念:每个 Pod 会获得一个从
- NonIndexed (默认):
- 工作队列 (Work Queue)
这种模式通常用于并行处理,但任务总数不固定,或者由工作队列(如 RabbitMQ, Redis)来决定何时结束。
- 核心特征:
- Pod 必须能够通过外部服务(队列)或者相互协调来判断是否还有工作要做。
- 关键终止逻辑:一旦 任意一个 Pod 成功终止,Job Controller 就认为整个任务队列已经空了(工作完成)。
- 此时,Job 会立即停止创建新 Pod,并开始终止其他还在运行的 Pod。
- 配置方式:
.spec.completions:不设置。.spec.parallelism:设置为大于 1 的整数(启用并行)。
- 适用场景:
- 多个 Worker 消费者从 RabbitMQ 中抢任务,当队列为空时,Worker 正常退出。
Controlling parallelism
The requested parallelism (.spec.parallelism) can be set to any non-negative value. If it is unspecified, it defaults to 1. If it is specified as 0, then the Job is effectively paused until it is increased.
Pod failure policy
在 Kubernetes 批处理任务(Jobs)的框架下,故障处理与终止策略是确保任务可靠性、资源利用率以及异常情况自愈的核心机制。根据提供的资料,这些策略可以从失败重试、精细化策略控制、时间限制以及完成后的自动清理四个维度进行深入探讨。
- 基础故障处理:重试与退避机制
Job 的基本职能是确保指定数量的 Pod 成功终止。当故障发生时,系统采用以下机制:
• 重启策略(Restart Policy): Job 仅支持 Never 或 OnFailure。若设为 OnFailure,容器失败时会在原 Pod 内重启;若为 Never,Pod 失败时 Job 控制器会创建新 Pod。
• 回退限制(backoffLimit): 字段 .spec.backoffLimit 定义了在将 Job 标记为失败前的最大重试次数,默认值为 6。
• 指数退避延迟: 失败的 Pod 会以指数级的延迟(10s, 20s, 40s...)重新创建,延迟上限为 6 分钟。
• 按索引退避(backoffLimitPerIndex): 在索引 Job 中,可以为每个索引独立设置重试上限,某个索引的失败不会中断其他索引的执行。
- 精细化失败策略(Pod Failure Policy)
为了更灵活地处理不同类型的失败,Kubernetes 提供了 .spec.podFailurePolicy:
• 基于规则的动作: 可以根据容器的退出码或 Pod 条件(如 DisruptionTarget 节点干扰)采取不同行动。
• 可选动作:
◦ FailJob: 一旦匹配(如发现软件逻辑漏洞的特定退出码),立即停止整个 Job 并终止所有运行中的 Pod。
◦ Ignore: 忽略此类失败(如因抢占导致的 Pod 终止),不计入 backoffLimit 计数。
◦ Count/FailIndex: 按照默认方式计数或仅标记当前索引失败。
- 主动终止与成功判定策略
除了被动等待 Pod 运行,Job 还可以主动控制任务的生命周期:
• 主动截止时间(activeDeadlineSeconds): 该字段设置 Job 的运行时间上限。它具有最高优先级,一旦超时,无论 backoffLimit 是否达到,系统都会终止所有 Pod 并标记 Job 为失败。
• 成功策略(Success Policy): 允许用户定义 Job 何时被视为成功。例如在模拟计算中,只要特定比例的索引成功,或者指定的“领导者”索引成功,即可宣布 Job 成功并终止剩余 Pod。
- 终止后的状态管理与清理
Job 达到终态(Complete 或 Failed)后的处理同样重要:
• 延迟终端状态确认: 自 v1.31 起,Job 控制器会等待所有 Pod 彻底终止后,才添加最终的 Complete 或 Failed 状态标签。
• 自动清理(TTL-after-finished): 通过 .spec.ttlSecondsAfterFinished 字段,控制器会在 Job 完成后的指定秒数内执行级联删除,清理 Job 对象及其关联的 Pod,以减轻 API 服务器的压力。
• 手动清理: 默认情况下,完成的 Job 及其日志会保留在 API 中供诊断使用,直到用户手动删除。
--------------------------------------------------------------------------------
比喻理解: 可以将 Kubernetes Job 的故障处理想象成一场有严格规章的科学实验。backoffLimit 是允许实验失败重启的次数;podFailurePolicy 就像实验室准则,规定了如果是因为“仪器坏了(节点干扰)”就重新再做一次且不扣分,但如果是“实验逻辑错误(特定退出码)”就直接终止整个项目。而 activeDeadlineSeconds 则是实验室的下班铃声,铃声一响,无论实验进度如何都必须强行停止。最后,TTL-after-finished 就像是自动清洁机器人,在实验结束并留出足够时间让你记录数据后,自动把实验室打扫干净。
example:
apiVersion: batch/v1
kind: Job
metadata:
  name: robust-job-demo
spec:
  # 1. 全局重试限制 (默认是6,这里设为4)
  backoffLimit: 4

  # 2. 整个 Job 的硬性超时时间 (10分钟)
  activeDeadlineSeconds: 600

  # 3. 智能失败策略 (v1.26+ 稳定特性)
  podFailurePolicy:
    rules:
    - action: Ignore             # 如果是因为 Disruption (如节点被删) 导致的失败,不计入重试次数
      onPodConditions:
      - type: DisruptionTarget
    - action: FailJob            # 如果容器返回 42 号错误码,直接让 Job 失败,别重试了
      onExitCodes:
        containerName: main      # 指定容器名
        operator: In
        values: [42]

  template:
    spec:
      restartPolicy: Never       # 配合 podFailurePolicy 推荐使用 Never
      containers:
      - name: main
        image: busybox
        # 模拟:随机失败,或者休眠
        command: ["sh", "-c", "echo 'Processing...'; sleep 5; exit 1"]
Success policy
在 Kubernetes 批处理任务(Jobs)的背景下,**成功策略(Success Policy)**定义了 Job 何时可以被宣告为“执行成功”。这一机制在 v1.31 及更高版本中提供了比默认计数更精细的控制手段。
以下是根据来源对 Job 成功策略及其核心机制的详细讨论:
- 默认的成功判定标准
在没有额外配置的情况下,Job 的成功判定遵循简单的计数逻辑:
• 非并行任务:一旦唯一的 Pod 成功终止,任务即宣告成功。
• 固定完成计数并行任务:当成功终止的 Pod 数量达到 .spec.completions 指定的数值时,Job 才被视为完成。
• 工作队列模式:只要有任何一个 Pod 成功终止,且所有已启动的 Pod 都已停止,Job 就算成功。
• 索引模式(Indexed Job):默认要求从 0 到 completions-1 的每一个索引都至少有一个成功的 Pod。
- 精细化成功策略 (
.spec.successPolicy)
为了应对更复杂的业务需求,Kubernetes 引入了 .spec.successPolicy(主要针对索引任务),允许用户在不等待所有索引成功的情况下宣告任务成功。
核心应用场景:
• 模拟实验:在运行带有不同参数的模拟任务时,可能并不需要所有参数的计算都成功,只要得到部分结果即可视为整体作业成功。
• 领导者-工作者模式:例如 MPI 或 PyTorch 框架,通常只有“领导者(Leader)”节点的成功才真正决定了整个 Job 的成败。
- 成功策略的规则配置
成功策略通过一组规则(Rules)定义,这些规则按顺序评估,一旦满足其中一条,后续规则将被忽略。规则主要包含两个维度:
• succeededIndexes**(成功索引集)**:指定必须成功的特定索引范围(如 0, 2-3)。
• succeededCount**(成功计数)**:指定需要成功的最小索引数量。
配置组合方式:
- 仅指定索引集:当该集合中的所有索引都成功时,Job 成功。
- 仅指定计数:当成功的索引总数达到该值时,Job 成功。
- 两者结合:当指定的索引子集中成功的数量达到
succeededCount时,Job 即刻宣告成功。 - 优先级与终止流程
• 策略优先级:来源特别指出,如果 Job 同时定义了成功策略和终止策略(如 .spec.backoffLimit 或 .spec.podFailurePolicy),一旦触发了终止策略(判定为失败),系统将优先遵守终止策略并忽略成功策略。
• 清理存余 Pod:一旦 Job 满足了成功策略,控制器会立即标记 Job 满足成功准则(添加 SuccessCriteriaMet 条件),并主动终止所有仍在运行的残余 Pod。
• 状态转变:在所有 Pod 彻底终止后,Job 的最终状态才会转变为 Complete。
- 状态跟踪机制
在 Job 满足成功条件后,其状态会发生细微变化:
• SuccessCriteriaMet:这是触发终止流程的信号。用户可以通过该条件提前判断任务是否已经达成目标,而无需等待所有 Pod 彻底关闭。
• CompletedIndexes:无论是否设置了成功策略,系统都会在状态中记录下所有已成功的索引。
--------------------------------------------------------------------------------
比喻理解: 可以将 Job 成功策略想象成一场“选拔赛”。
• 默认模式:相当于“全员达标”,必须所有的运动员(索引)都通过考核,整个代表队才算合格。
• 成功策略模式:则提供了更灵活的规则。比如“核心成员达标制”,只要 1 号种子选手(Leader 索引)赢了,或者预选名单里有任意 3 个人(succeededCount)出线,整个队伍就可以提前宣告胜利并收工回家,剩下的选拔流程(仍在运行的 Pod)会被直接取消。
example:
apiVersion: batch/v1
kind: Job
metadata:
  name: success-policy-demo
spec:
  completions: 5
  parallelism: 5
  completionMode: Indexed  # 必须开启 Indexed 模式

  # 核心配置:成功策略
  successPolicy:
    rules:
      - succeededIndexes: "0"  # 规则1: 索引 0 必须成功
        succeededCount: 1      # 这里的 Count 是指命中的索引数量
      - succeededIndexes: "1-4" # 规则2: 在索引 1到4 中
        succeededCount: 2       # 只要有任意 2 个成功即可

  template:
    spec:
      restartPolicy: Never
      containers:
      - name: worker
        image: busybox
        # 模拟逻辑:打印自己的 Index。
        # $JOB_COMPLETION_INDEX 是 Indexed Job 注入的环境变量
        command:
        - sh
        - -c
        - |
          echo "我是 Worker $JOB_COMPLETION_INDEX"
          sleep 10
          exit 0
Job termination and cleanup
在 Kubernetes 批处理任务(Jobs)的框架下,生命周期管理与清理是一个从任务启动、状态监控到最终资源回收的完整闭环。根据提供的资料,这一过程不仅涉及任务的成败判定,还包括为了减轻 API 服务器压力而设计的多种自动和手动清理机制。
以下是根据来源对 Job 生命周期管理与清理的详细讨论:
- Job 的生命周期阶段与终端状态
Job 旨在运行一次性任务直至成功完成。其生命周期包含以下关键节点:
• 重试与追踪:Job 会持续重试执行 Pod,直到达到指定的成功完成次数。在此期间,控制平面使用 batch.kubernetes.io/job-tracking **终止器(Finalizer)**来追踪所属 Pod,确保 Pod 在被计入状态之前不会被彻底移除。
• 终端状态:Job 最终会进入两个终端状态之一:**Succeeded(成功)**或 Failed(失败)。
• 状态转变的延迟处理:在 Kubernetes v1.31 及更高版本中,控制器会延迟添加终端条件(Complete 或 Failed),直到该 Job 的所有 Pod 都已彻底终止。在此之前,系统会先通过 SuccessCriteriaMet 或 FailureTarget 条件来触发 Pod 的终止流程。
- 手动清理与诊断保留
默认情况下,Job 完成后其对象和 Pod 不会被自动删除。
• 保留目的:保留已完成的 Pod 允许用户查看标准输出日志、警告或其他诊断信息。
• 手动操作:用户需要通过 kubectl delete 手动删除旧 Job。删除 Job 对象时,它所创建的所有 Pod 也会被一并清理。
- 核心自动化清理机制:TTL-after-finished
为了避免已完成任务在 API 服务器中无限堆积,Kubernetes 提供了 TTL(生存时间)机制。
• 工作原理:通过在 Job 中指定 .spec.ttlSecondsAfterFinished 字段,设置任务完成后的保留秒数。
• 级联删除:当 TTL 过期时,TTL 控制器会执行级联删除,即同时删除 Job 及其所有依赖对象(如 Pods)。
• 灵活性:此字段可以随时设置:既可以在创建时指定,也可以在任务完成后手动更新,甚至可以通过 Mutating Admission Webhook 动态注入(例如根据成功或失败状态设置不同的保留时间)。
• 注意事项:该机制对集群内的**时间偏差(Time Skew)**非常敏感,可能导致在错误的时间触发清理。
- 其他生命周期控制手段
• **主动截止时间 ( activeDeadlineSeconds **):这是一种基于时间的终止策略。一旦达到设定的时间上限,Job 会终止所有运行中的 Pod 并转为失败状态。
• CronJob 管理:如果 Job 由 CronJob 管理,系统会根据 CronJob 定义的基于容量的清理策略(Capacity-based cleanup policy)自动清理历史任务。
• 挂起与恢复:通过设置 .spec.suspend: true,可以临时停止 Job 的执行并终止其活跃 Pod,直到重新恢复(此时 activeDeadlineSeconds 计时器会重置)。
- 生命周期管理的最佳实践
资料建议,对于直接创建的非托管 Job(Unmanaged Jobs),强烈推荐设置 TTL 字段。因为这些 Job 默认的删除策略可能会导致 Pod 在 Job 删除后变成“孤儿(Orphan)”,虽然系统最终会进行垃圾回收,但在此之前大量堆积的 Pod 可能会导致集群性能下降甚至下线。
比喻理解: 可以将 Job 的生命周期管理想象成一个“自动化实验室”。
• 手动清理就像是实验结束后,实验员(用户)必须亲自进入实验室打扫(kubectl delete),否则实验器材(Pod)和记录单(Job 对象)会一直占用空间。
• TTL 机制则是一个“自动销毁定时器”。实验一结束(完成或失败),定时器开始倒计时;一旦时间到,实验室会自动进行大扫除,把记录单和器材全部清空。
• **Finalizers(终止器)**就像是在每个器材上贴的“审计标签”,确保在实验室系统确认实验结果之前,没有任何器材会被偷偷扔掉。
Advanced usage
在 Kubernetes Job 的架构中,“高级用法”涵盖了从精准的调度控制到生命周期接管的一系列复杂机制,旨在满足大规模、高性能或自定义化的批处理需求。
以下是根据来源对 Job 高级用法的详细讨论:
- 任务挂起与恢复 (Suspending a Job)
用户可以通过更新 .spec.suspend 字段来控制 Job 的执行状态。
• 灵活控制:Job 可以创建时即处于挂起状态(true),由自定义控制器决定何时启动;也可以在运行中挂起。
• 资源清理与重置:挂起 Job 会导致所有未完成的 Pod 被终止(发送 SIGTERM)。当 Job 恢复(设为 false)时,其 .status.startTime 会重置,这意味着 activeDeadlineSeconds 计时器也会随之停止并重置。
- 可变调度指令 (Mutable Scheduling Directives)
这是一项针对挂起 Job 的高级特性,允许在任务启动前调整其调度约束。
• 适用条件:仅适用于处于挂起状态且从未被恢复运行过的 Job。
• 调度优化:自定义队列控制器可以在 Job 实际启动前,更新 Pod 模板中的节点亲和性 (Node Affinity)、节点选择器 (Node Selector)、容忍度 (Tolerations) 等字段,从而引导 Pod 精确落地到目标节点。
- 自定义 Pod 选择器 (Specifying your own Pod selector)
虽然系统默认会自动生成唯一的选择器,但在特定运维场景下可以手动干预。
• 接管现有 Pod:例如,当需要更新 Job 的 Pod 模板或名称,但又想保留正在运行的 Pod 时,可以使用 kubectl delete --cascade=orphan 删除旧 Job,并创建一个带有相同选择器的新 Job。
• 配置要求:在这种情况下,必须显式设置 manualSelector: true,以告知系统该选择器不匹配系统自动生成的 UID 是预期行为。
- 弹性索引 Job (Elastic Indexed Jobs)
对于索引模式的 Job,Kubernetes 支持在线动态缩放。
• 联动缩放:用户可以同时修改 .spec.parallelism 和 .spec.completions,只要保持两者相等(.spec.parallelism == .spec.completions),即可实现扩缩容。
• 场景应用:这在分布式训练(如 MPI、PyTorch、Ray)等需要根据资源情况动态调整工作规模的场景中非常有用。
- Pod 替换策略 (Pod Replacement Policy)
用户可以控制系统何时创建替代 Pod,以避免资源冗余。
• 替换时机:通过设置 .spec.podReplacementPolicy: Failed,Job 控制器将等待旧 Pod 完全达到“失败”阶段后再创建新 Pod,而不是在 Pod 一进入“终止中”状态就立即替换。
• 防止超量:这确保了在任何时刻,运行中的 Pod 数量都不会超过并行度限制或每个索引一个 Pod 的限制。
- 委派管理 (Delegation to External Controller)
通过 spec.managedBy 字段,用户可以禁用内置的 Job 控制器,并将该 Job 的调和逻辑完全委派给外部控制器(例如第三方批处理调度器)。
• 标识符:只要该字段的值不是 kubernetes.io/job-controller,内置控制器就会忽略该对象。
• 开发者约束:外部控制器必须遵循 Job API 规范,且不得使用内置控制器预留的追踪终止器(batch.kubernetes.io/job-tracking)。
比喻理解: 如果把普通 Job 比作一台“全自动洗衣机”(按一下就开始,洗完就停),那么这些高级用法就像是给洗衣机增加了“中途暂停(挂起)”、“洗前自动识别衣物材质并调整转速(可变调度)”以及“允许外接专业洗涤模块(委派管理)”的功能。这些功能让原本简单的批处理任务能够适应更复杂的工业级作业环境。
Kubernetes Job 自动清理机制
在 Kubernetes 的批处理任务(Jobs)管理中,已完成任务的自动清理是一个至关重要的维护机制。它不仅能保持集群的整洁,还能有效减轻 API 服务器的压力。
根据提供的来源,以下是对该机制的详细讨论:
- 核心机制:TTL-after-finished 控制器
Kubernetes 提供了一个 TTL-after-finished 控制器,专门用于限制已完成 Job 对象的生命周期。
• 触发条件:当 Job 的状态条件变为 **Complete(成功)**或 **Failed(失败)**时,计时器开始启动。
• 清理行为:一旦设定的 TTL(生存时间)过期,该 Job 就会进入可被清理的状态。控制器会执行级联删除(Cascading Removal),这意味着 Job 对象及其关联的所有依赖对象(如生成的 Pods)将一同被删除。
• 生命周期保证:即使触发了清理,Kubernetes 仍会尊重对象的生命周期保证,例如等待终结器(Finalizers)处理完成。
- 关键配置字段:
.spec.ttlSecondsAfterFinished
该机制主要通过 Job 的 .spec.ttlSecondsAfterFinished 字段进行配置:
• 立即删除:如果将该字段设置为 0,Job 在完成后会立即符合被自动删除的条件。
• 无限保留:如果该字段未设置,TTL 控制器将不会清理该 Job。
• 灵活设置方式:
◦ 在创建 Job 的 **Manifest(清单)**中静态指定。
◦ 对已经运行完成的 Job 进行手动更新以启动清理。
◦ 使用**准入插件(Mutating Admission Webhook)**在 Job 创建时动态设置,或者在 Job 完成后根据其状态(成功或失败)设置不同的 TTL 值。
◦ 通过编写自定义控制器,为匹配特定选择器(Selector)的一类 Job 管理清理策略。
- 为什么自动清理至关重要?
• 减轻 API 服务器压力:保留大量的已完成任务会占用 API 服务器的存储资源并影响性能。
• 防止 Pod 孤儿化(Orphan Pods):对于非 CronJob 管理的“非托管 Job(Unmanaged Jobs)”,其默认删除策略可能会导致 Pod 在 Job 删除后残留。来源强烈建议为这类 Job 设置 TTL 字段,因为大量积压的残留 Pod 可能导致集群性能下降甚至下线。
• CronJob 的替代方案:如果 Job 是由 CronJob 管理的,则通常遵循 CronJob 定义的基于容量的清理策略(Capacity-based cleanup policy)。
- 使用限制与注意事项
在实施自动清理时,需要警惕以下风险:
• 时间偏差(Time Skew)风险:TTL 控制器依赖存储在 Job 对象中的时间戳。如果集群内各节点的时钟不一致,可能导致控制器在错误的时间(过早或过晚)清理 Job。
• 修改过期 TTL 无效:如果在现有的 TTL 已过期后才尝试更新并延长该字段的值,Kubernetes 无法保证会保留该 Job,即使 API 请求返回成功。
• 诊断数据丢失:一旦 Job 被清理,其关联的 Pod 及其日志也将一并消失。因此,通常需要保留一段时间以便用户检查错误、警告或诊断输出。
比喻理解: 你可以将已完成的 Job 想象成一张“餐厅结账单”。默认情况下,账单会留在桌上,直到服务员(用户)手动收走。设置 .spec.ttlSecondsAfterFinished 就像是给账单装了一个“自动碎纸机”:它允许你在客人离开(任务完成)后的几分钟内查看消费明细(日志);一旦倒计时结束,碎纸机就会自动把账单和桌上的餐具(Pod)全部清理干净,腾出位置给下一位客人。
CronJob
根据提供的来源,CronJob 是 Kubernetes 中用于管理周期性、重复性任务的核心控制器。它通过 Cron 格式的时间表来自动创建 Job 对象,类似于 Unix 系统中的 crontab。
以下是来源中关于 CronJob 的详细讨论:
- 核心定义与功能
- 重复性调度:CronJob 主要用于执行定期操作,如备份、报告生成等。
- 职责分工:CronJob 仅负责根据预设的时间表创建对应的 Job 对象,而具体的 Pod 管理和任务执行则由产生的 Job 负责。
- 名称限制:CronJob 的名称必须是有效的 DNS 子域名,且长度不得超过 52 个字符。这是因为控制器会自动在名称后附加 11 个字符,而 Job 的总长度限制为 63 个字符。
- 时间表与时区设置
- 语法规范:
.spec.schedule字段是必填项,遵循标准的 Cron 语法(分钟、小时、日、月、星期)。它支持 “/” 步长值(如*/2表示每两小时一次)以及 “?”(与 “*” 含义相同)。 - 宏命令:支持使用一些预设宏,如
@monthly(每月一次)、@weekly(每周一次)、@daily(每天一次)等。 - 时区管理:
- 默认情况下,调度基于控制平面的本地时区解释。
- 用户可以通过
.spec.timeZone显式指定时区(如"Etc/UTC")。 - 需要注意,不支持在
schedule字段中使用TZ或CRON_TZ变量,这会导致验证错误。
- 并发策略与任务挂起
- 并发策略 (
.spec.concurrencyPolicy):定义了当新任务到达而旧任务尚未完成时的处理方式:- Allow(默认):允许并发运行多个 Job。
- Forbid:禁止并发;如果前一个未完,则跳过当前调度。
- Replace:用新创建的 Job 替换当前正在运行的 Job。
- 挂起 (
.spec.suspend):设置为true时,所有后续调度都会被暂停,直到恢复。这不会影响已经开始运行的 Job。挂起期间错过的调度会被计为“错过”的任务。
- 延迟启动与故障处理
- 启动截止时间 (
.spec.startingDeadlineSeconds):该字段定义了 Job 错过预定时间后仍被允许启动的窗口期(以秒为单位)。- 如果错过的时长超过此限值,该次执行会被跳过并视为失败。
- 如果该值设为小于 10 秒,可能导致任务无法被调度,因为控制器每 10 秒检查一次。
- 100 次错过限制:如果控制器检测到自上次调度以来错过的次数超过 100 次,它将停止创建 Job 并记录错误。
- 设置
startingDeadlineSeconds会改变这一行为:控制器将只计算该限值时间范围内错过的次数(例如,过去 200 秒内错过了几次),从而避免因长时间停机导致的调度停止。
- 设置
- 生命周期与模板管理
- Job 模板:
.spec.jobTemplate定义了创建 Job 的规格。对 CronJob 的修改仅适用于后续新创建的 Job,正在运行的任务不会受到影响。 - 历史记录保留:通过
.spec.successfulJobsHistoryLimit(默认 3)和.spec.failedJobsHistoryLimit(默认 1)来控制保留多少个已完成的任务记录。 - 幂等性要求:由于调度是近似的(可能偶尔创建两个 Job 或不创建),定义的任务逻辑应当是**幂等(Idempotent)**的。
- 时间戳注解:从 v1.32 开始,CronJob 会为创建的 Job 添加
batch.kubernetes.io/cronjob-scheduled-timestamp注解,记录原始预定时间。
比喻理解: 可以将 CronJob 想象成一个工厂的“自动排班表”。
Schedule 是排班的时间表(如每天 8 点);
JobTemplate 是给员工的“工作任务书”;
Concurrency Policy 决定了如果 8 点该接班时,上一班的人还没干完,是大家挤在一起干(Allow)、让新来的人回家休息(Forbid)、还是直接把旧员工赶走换新人(Replace)。
StartingDeadlineSeconds 就像是“迟到容忍期”,如果工厂停电了 10 分钟,只要没超过容忍期,来电后员工还是可以补上班;但如果停电太久超过了容忍期,那这一班就干脆不上了。
Deployment VS CronJob
长期服务 (Service/Web) 一次性/定时任务 (Batch) 关系说明 Deployment CronJob 最上层控制器 (定义期望状态/时间表) ReplicaSet Job 中间层控制器 (确保副本数/确保任务成功) Pod Pod 最小执行单元 (容器封装)
Managing Workloads
在 Kubernetes 中,工作负载管理(Workload Management)涵盖了从资源组织、批量操作到应用程序的平滑更新与自动扩缩容的完整体系。
以下是根据来源对 Kubernetes 工作负载管理核心内容的讨论:
- 资源配置的组织与管理
高效的管理始于良好的资源组织:
• 资源分组:建议将属于同一微服务或应用程序层级的多个资源(如 Deployment 和 Service)组织在同一个 YAML 文件中,并用 --- 分隔。
• 创建顺序:在清单文件中,建议优先定义 Service。这能确保调度程序在控制器(如 Deployment)创建 Pod 时,能够更好地将它们分散部署。
• 外部管理工具:除了原生清单,还可以使用 Helm(通过 Chart 管理预配置的资源包)或 Kustomize(用于添加、删除或更新配置选项)来简化工作负载管理。
- 批量与递归操作
kubectl 提供了强大的批量处理能力:
• 批量执行:可以使用 kubectl apply -f <目录或 URL> 同时创建多个资源。
• 递归处理:如果资源分布在多个子目录中,通过指定 --recursive 或 -R 参数,可以递归地对所有子目录执行创建、获取、删除或滚动更新等操作。
• 筛选与链式操作:利用标签选择器(-l 或 --selector)可以精准过滤并批量删除资源。此外,还可以将 kubectl 的输出(resource/name 格式)通过管道传递给其他命令进行链式处理。
应用程序的无损更新
Sometimes it's necessary to make narrow, non-disruptive updates to resources you've created.
更新是工作负载管理的日常核心:
• 滚动更新(Rollout):支持在不中断服务的情况下更新应用。系统会逐渐将流量从旧 Pod 转移到健康的新 Pod。用户可以使用 kubectl rollout 来管理更新过程,包括查看状态、暂停、恢复或取消更新。
• 金丝雀发布(Canary Deployments):通过使用不同的标签(如 track: stable 和 track: canary)标记不同版本的副本,可以实现新旧版本并存。通过调整各版本副本的数量比例,可以控制分流到新版本的生产流量比例。
- 扩缩容策略 (Scaling)
为了应对负载变化,Kubernetes 提供了手动和自动两种方式:
• 手动扩缩容:使用 kubectl scale 直接增加或减少副本数量。
• 自动扩缩容:使用 kubectl autoscale 配置 HorizontalPodAutoscaler (HPA)。在存在容器和 Pod 指标源的情况下,系统会根据实际负载在设定的范围内(如 1 到 3 个副本)自动调整数量。
- 资源更新的机制
更新资源的方式取决于变更的性质:
• 就地更新:
◦ kubectl apply:将当前配置与之前版本进行比较,仅应用更改部分,不会覆盖未指定的自动化属性。
◦ kubectl edit:在编辑器中直接交互式修改资源。
◦ kubectl patch:用于对 API 对象进行狭窄、非破坏性的就地更新。
• 破坏性更新:对于某些一旦初始化就无法更改的字段,必须使用 replace --force。该操作会删除现有资源并重新创建它。
比喻理解: 管理 Kubernetes 工作负载就像经营一家连锁餐厅。资源组织就像是编写标准化的菜谱(YAML)并将相关的食材打包;滚动更新就像是在营业时逐个更换旧桌椅,确保客人在任何时候都有位子坐;而自动扩缩容则像是一个智能经理,根据门口排队的客流量(负载指标),自动决定是多开几个服务窗口还是让部分员工下班休息。
Autoscaling Workloads
在 Kubernetes 中,工作负载自动扩缩(Autoscaling) 是指系统能够根据当前的资源需求,自动更新管理 Pod 的对象(如 Deployment),从而使集群能够更具弹性和效率地响应负载变化。
根据来源,自动扩缩主要分为以下几个维度和工具:
- 水平扩缩与垂直扩缩
这是自动扩缩的两种基本方法:
• 水平自动扩缩 (Horizontal Scaling):通过 HorizontalPodAutoscaler (HPA) 实现,其核心是调整工作负载的副本数量(Replicas)。HPA 会定期根据观察到的资源利用率(如 CPU 或内存使用情况)来增加或减少实例数量。
• 垂直自动扩缩 (Vertical Scaling):通过 VerticalPodAutoscaler (VPA) 实现,其核心是调整分配给容器的 CPU 和内存资源大小。
◦ 注意:VPA 不是 Kubernetes 的内置核心组件,而是需要额外部署的插件,且运行它必须安装 Metrics Server。
◦ 现状:截至 Kubernetes v1.35,VPA 尚不支持 Pod 资源的“就地(In-place)”调整,相关集成工作仍在进行中。
- 基于集群规模的自动扩缩
对于某些需要随集群大小变动的系统组件(如 cluster-dns),可以使用特定工具:
• Cluster Proportional Autoscaler:监控集群中可调度的节点数和核心数,并相应地缩放目标工作负载的副本数。
• Cluster Proportional Vertical Autoscaler:目前处于 Beta 阶段,它不改变副本数,而是根据集群节点或核心的数量来调整工作负载的资源请求(Resource Requests)。
- 事件驱动与定时扩缩
除了基于资源指标(CPU/内存),工作负载还可以基于外部事件或时间表进行扩缩:
• 事件驱动扩缩:利用 KEDA (Kubernetes Event Driven Autoscaler),可以根据待处理的事件数量(例如队列中的消息数)进行扩缩。KEDA 提供了丰富的适配器来连接不同的事件源。
• 定时扩缩:通过 KEDA 的 Cron 扩缩器,用户可以定义特定的时间表和时区来执行扩缩操作。这在业务高峰期前提前扩容,或在非高峰期(Off-peak hours)缩容以节省成本时非常有用。
- 基础设施层面的扩缩
当工作负载层的自动扩缩仍无法满足需求时,可能需要对集群基础设施本身进行扩缩。这通常意味着自动添加或移除集群中的节点(Nodes)。
比喻理解: 可以将 Kubernetes 工作负载自动扩缩 想象成一家自动化的制衣厂:
• 水平扩缩 (HPA) 就像是发现订单变多时,自动增开几条同样的生产线(副本);
• 垂直扩缩 (VPA) 则是发现衣服太厚,自动给现有的缝纫机升级更强力的马达(资源);
• 基于集群规模的扩缩 就像是厂房每扩建一个车间,就自动多配几个保洁员;
• 事件驱动 (KEDA) 则像是仓库门口的感应器,看到货车(消息队列)排队了,才命令工厂立刻开工。